
Lost Cities
| Items and Tasks |
|---|
| 4 Dark Gems 7 Dragon Eggs 9 Light Gems |
| Destroy all the Dark Gems Access the Cloudy Domain Collect 20 Light Gems Access the Sunken Ruins Activate 1st Water Wheel Activate 2nd Water Wheel Collect Reward Let Blink Explore Save the Turtles Defeat Inteptune Activate Teleporter |
Straight ahead you'll notice Moneybags and his shop here in the Lost Cities Realm, he charges the same prices as his shop in the Dragon Kingdom. The locked chest on the other side of his shop only contains 200 gems, so it's basically a ripoff since keys, err Lock-Picks, cost 500 gems.
Once you're done with this area, head over to the forcefield protecting the boss, Ineptune, from Spyro until you've destroyed another ten Dark Gems. Just to the right of the forcefield is a passageway up a short jump. Follow it through to a small tunnel. You'll notice a couple of large blue crabs. These can be killed in either of two ways at the moment, either zap them with your electric breath (sustained) or charge into them after its attempted to claw you, it'll turn over leaving you to Horn Dive the round circle on its underbelly.
 DRAGON EGG 19/80 - Sgt. Byrd Set DRAGON EGG 19/80 - Sgt. Byrd Set |
|---|
| At the end of a short tunnel after some floating seashells above a piranha infested pool. |
Just after them you'll meet a few tribe-like creatures, flame these as electricity takes too long on each and they'll quickly attack you. Try to avoid going into the water here as there are piranhas, they can be killed but it's more trouble then it's worth. Use the floating seashells to get across to a ledge on the far end of the lake.
Once you've got that Dragon Egg, head on back to the first area of the level. When you get to the end of the path which you followed into the area with the piranhas, turn right and follow the path there along. You'll find some more crabs and things along there before getting to Otto. He'll want you to fill his pool.
[ ] - Activate 1st Water Wheel
Jump down into the shallow water and head to the other end smiting crabs as you go. You should see some green platforms at the end with an armoured Gnorc standing a bit back, head up there. Kill all the Gnorcs and things down this path, and then as you reach a large waterwheel, go over to the lefthand side. Get up to the highest point of the wall and then jump onto one of the poles sticking out of the waterwheel, if you have the Tail Spin ability you'll attach to it. Jump forwards to the other pole, this will turn the wheel and so turn you, repeat this process as many times as you can as quickly as you can. There's no need to wait for you to stop moving, you can jump as it's still going backwards in order to speed up the process.
Once the red bar reaches full, the water outside will rise up half-way.
[ ] - Activate 2nd Water Wheel
 DARK GEM 11/40 DARK GEM 11/40 |
|---|
| Next to Moneybags' Shop 'Waterfall Walkway', it creates two green bridges one of which leads to the second waterwheel. |
Head back out to the pool again, and go straight ahead to go through a hole in the side of a small tower. Go through the very short tunnel to come out in an area with Moneybags' Shop 'Waterfall Walkway' and Blink standing behind it.
 DRAGON EGG 20/80 - Blink Set DRAGON EGG 20/80 - Blink Set |
|---|
| At the end of the section after the left-hand bridge created by Dark Gem #11, jump on the second of the electric platforms aim downwards and use electric breath on it. |
Head along the left bridge, watch out for the archers, and along through.
Next, take the bridge to the right, the second waterwheel is found here. To activate it, you'll need to jump on one three platforms attached to it, the one required to start it moving is the one on the right. In the same way, jump from one to the other in order to get the wheel spinning faster. The water will now fully fill up.
Back down the bridges again and over to Blink.
[ ] - Let Blink Explore
Another of Blink's underground missions, and as before it's basically the same. First time through for a Dragon Egg, second for a Light Gem.
Jump down the ledge in front of you, and there's the first Dark Shard, though of course you don't have any Blink Bomb's just yet, you'll find a dispenser just a fraction away. Jump back up to the start again and then onto the platform infront, it'll move down towards you. Use the moving grabby platforms to get across to the second Dark Shard. Jump down off that platform and then dig through the wall here.
Head to the right and throw one of your bombs at the large mine sitting on a platform. Then jump onto the freed up platform and get aboard the platform that moves down to you. Wait till it gets you to the top and then jump onto the monkey bars. Follow them along, you'll need to jump down and up again about halfway, all the way to the other end. There are a couple of spiders here, shoot them and then jump over to where the third Dark Shard is.
| DRAGON EGG 21/80 - Blink Set |
|---|
| Complete Blink's mini-game on Easy mode. |
Now simply jump down to the large platform below, look before you leap, and shoot the spiders. Then destroy Dark Shard number four. Throw a bomb at the nearby mine, use the platform to get over to the fifth Dark Shard, and relax.
For Hard mode, you'll need to now dig through the wall here. Collect any extra bombs you need and drop down to a shelf below the place you're standing on, make sure not to fall into the water. Dark Shard #6 is here. Once it's taken care of, a rock will fall allowing you to get over to a spider and continue on with the level.
Next to this spider is the seventh Dark Shard. Jump across a couple of platforms and then shoot a couple of spiders in an area below you. That area also houses Shard 8. Use a bomb on the cracked wall here, shoot a spider and then get over to where it was, which is where the ninth Shard is found.
 LIGHT GEM 024/100 LIGHT GEM 024/100 |
|---|
| Complete Blink's mini-game on Hard mode. |
| LIGHT GEM 025/100 |
|---|
| In the most northern part of the most western part of the level, go into the bottom of a cracked tower. |
A platform comes down which will take you a short way up to a Wall Kick thing, use it to get up higher. There are some monkey bars up the top which you'll need to use, then wait for a moving platform to arrive and take you to a second set. Shoot the spiders before dropping down and taking care of this final Dark Shard.
Back in Spyro's world, go to the right (west) and through a short tunnel to a large open cove. Watch out for the swinging seashells and tribesmen things.
Note that you can jump over the fencing at the edge of this area, I just don't recommend it as you will die upon touching the water for some reason.
| DARK GEM 12/40 |
|---|
| On top of a blackened tower in the far west region of the level. |
Now head to the opposite side of the area and work your way up to the top of the blackened tower.
[ ] - Access the Sunken Ruins
This will cause a large dome to rise up out of the water nearby and for you to get a new task, one which isn't immediately needed to be completed, but you should probably do the first part of it now. Go towards the dome and use the pillars circling it as steps, get right to the middle of the dome and perform a Horn Dive on the circle there. This gives you access to a lift which will take you to Sunken Ruins. If you want you can go there now, but for the purposes of the walkthrough, I'll do that later.
[ ] - Collect Reward
| LIGHT GEM 026/100 |
|---|
| On a platform in Otto's pool. |
| LIGHT GEM 027/100 |
|---|
| Collect your reward from Otto for filling his pool up. |
About time to go get what Otto promised. Head back through the caves to the pool area. On your way back through the pool though, jump up onto the platform with a Horn Dive chest on it and then glide over to the Light Gem.
Once you've got that one, head back to where Otto is still standing.
Now head all the way back to the starting area, and go through the path opposite the one you just came out of. This should be leading to the eastern section of the level.
Here you will find a couple of buildings which spawn tribesmen, Horn Dive them to stop this, much like you may have done in Year of the Dragon with Sheila. Head into the far left corner of the area and go through to where there is a 20 Light Gem door, and luckily, you should have 27 by now if you've kept up with the walkthrough. Walk up to it and the doors will swing open.
 DRAGON EGG 22/80 - Concept Set DRAGON EGG 22/80 - Concept Set |
|---|
| Chase down the thief in the 20 Light Gem area. |
| LIGHT GEM 028/100 |
|---|
| In a cave at the far end of the 20 Light Gem area. |
In the main part of this area is a thief. Much like the thieves of the first game, he's carrying an egg.
Now head down the far end of the area and jump up into the cave.
All the way back out of the area now, go along the first path to your left as you get back out. Make sure not to fall into the browny green stuff on the floor, it will kill you. Continue through the area with a couple of platforms in, and into a second here.
Go over to the large red and white button and Horn Dive it. This will raise the two platforms you saw previously. Race back to them and use them to get up to the slightly higher solid platform. Then jump and glide over to a pole spinning pole which is used to get to a solid bit of land. It looks over a set of poles and windmills.
| LIGHT GEM 029/100 |
|---|
| At the end of a series of pole jumps and windmill avoids. |
This will require some good timing. Wait for the windmills to go round and jump as it passes the point when you'd get hit. If you're lucky you should be able to make it to the final pole with little trouble. You will need to do a jump and glide from this final one in order to reach the target Light Gem.
| LIGHT GEM 030/100 |
|---|
| Use a few electric platforms to get to this one near 'Domain Doorstep'. |
Another tunnel with the same swampy killy stuff in is at the bottom of this platform which you'll need to jump off now. Go through to where the shop 'Domain Doorstep' is. Jump across to Zoe and then up to the armoured Gnorc. Then use the electricity powered seashell to get across to another part of this area. Kill the large crabs here and then use the two powered seashells here to get up to a Light Gem. It's easier to just use the second one, aim downwards at it and activate it with your breath.
Another seashell nearby will take you almost all the way back to where the shop was, though you'll have to do a bit of gliding yourself. To the right now, and you'll find yourself by the entrance to Cloudy Domain. Again, you can use it if you want, though for the walkthrough I won't be just yet.
Head back out of this area again all the way past the windmills and the swampy bits, once you're back in the area that leads to the Light Gem door as well as the path you just came out of, go to the left and follow a third path out of here. Make sure to kill the armoured Gnorc right at the start of it.
| DARK GEM 13/40 |
|---|
| On a platform which causes another platform with a cannon on to rise out of the water. |
You'll emerge in a large pool area with a Dark Gem on a platform directly in front of you.
Now jump back to where Zoe is, and then use the poles that go along the wall. The first three are easy and just require a bit of timing. The fourth pole moves away and so requries you to jump slightly before it reaches its end point nearest you, then again to jump off right at its other end. The next requires the next one to be at the top, then jump and glide off this one to get to a solid platform. Jump to a second and then to a third.
 DRAGON EGG 23/80 - Spyro Set DRAGON EGG 23/80 - Spyro Set |
|---|
| On top of a platform in the water filled area with a cannon. |
The easiest way of doing the next part is to go all the way back to where Zoe is, getting onto the platform where the Dark Gem was and gliding over to the whirlwind near the Strong Door. Use it to get to the cannon platform.
| DARK GEM 14/40 |
|---|
| After a cracked wall which is down a tunnel after a Strong Door. |
Use the cannon to shoot several things, though the only one required is the Strong Door. Jump over to where the door was and go through the tunnel. Dodge the swinging seashells and charge into the cracked wall at the end.
 DRAGON EGG 24/80 - Character Set DRAGON EGG 24/80 - Character Set |
|---|
| On a tower in the south area of the level. Use a series of floating seashells to get to it. |
Glide down to a green platform sticking out of the water and jump over to a second which is closer to some moving seashells. Use these to get across to a tower at the far end of the cove.
[ ] - Save the Turtles
Drop down to the beach nearby and you'll be next to a piece of cracked wall. Smash it to reveal a short tunnel to the Turtle Mother.
This is another of Spyro's Turret Mini-Games, not really what would first spring to mind of a mini-game designed for Spyro, but whatever, it hardly matters who's doing the shooting. First Person here, and the task is to protect all the baby turtles from being stolen by the birds or crabs so that they can get into the water safely.
| DRAGON EGG 25/80 - Spyro Set |
|---|
| Complete the Turtle Mother's shooting task on Easy. |
| LIGHT GEM 031/100 |
|---|
| Complete the Turtle Mother's shooting task on Hard. |
Your best bet is to concentrate on the birds if you see any as these get away much faster then the slow crabs, there's basically nothing more to it then shooting them as they try to take them away, once 20 turtles have gotten into the water, it's complete. Hard mode requires you to save 27 of the little mites.
Level nearly complete. You'll only be able to get that last Light Gem above the waterwheel in this area once you've gotten Water Breath, and you won't be getting that until you beat this realm's boss. Onwards to Cloudy Domain!
Located in the far east part of Coastal Remains, use the fan to access it.
| Items and Tasks |
|---|
| 3 Dark Gems 7 Dragon Eggs 8 Light Gems |
| Destroy all the Dark Gems Visit Elder Titan Use Wing Shield Clear Sgt. Byrd's Speedway |
After what is basically a loading screen, though you can wander around and flame and stuff, you'll arrive in the Cloud Domain, famed for being cloudy. On your right you'll imediately spot Moneybags' hologram with the usual banter as well as a nice strong chest infront.
| LIGHT GEM 032/100 |
|---|
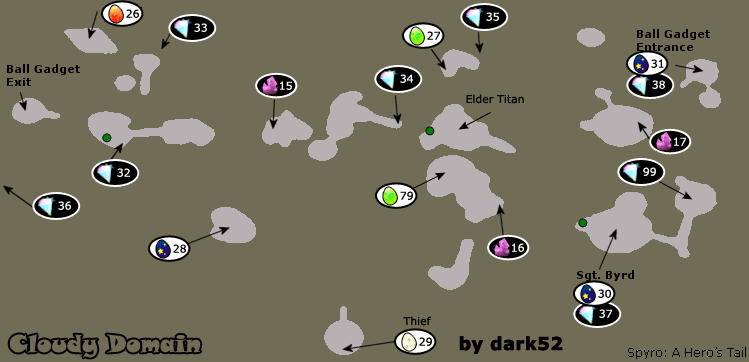
| Just to the right of where you start is a locked chest with this inside. |
Go down the path covered with gems and flame the large Gnorc wandering it. Into the room at the end and charge into the target on the wall to your right. Back out of the room again and jump onto the target on the right (north) onto the platform that lowers and fly towards the winged Gnorc flaming it as you pass. Go round to the left and glide over to where another winged Gnorc is waiting to attack.
 DRAGON EGG 26/80 - Flame Set DRAGON EGG 26/80 - Flame Set |
|---|
| In a locked chest found along the path to the left right from the start of the level. |
| LIGHT GEM 033/100 |
|---|
| Right at the very end of the path to the left at the start of the level. |
Out the other end and another Horn Dive switch. Follow the series of now moving platforms along until you reach a blue circle platform. If you stand on a part of it that part will turn white and then vanish, if you're still on it when it vanishes you'll fall, so get moving over this one quickly. Through another room and to a firework which will destroy a strong box as per usual. Jump forwards.
Jump down to the start of the path and back to near the start of the level. You could go across and Horn Dive the other switch, but there'd be no point at the moment as you will need a new skill in order to get all the way.
| DARK GEM 15/40 |
|---|
| After a couple of moving platforms quite near the start of the level. |
Go left and into the room with the two switches, Horn Dive the one in the middle this time. Glide over to a moving platform and flame another blue flying Gnorc, followed by another platform and Gnorc.
Destroying this Dark Gem will fix a fan and cause a thermal to turn back on again, very useful if you want to get any further. If you happen to want three pieces of free ammo, jump over to the now fixed platform and go around the other side where a firework is sitting. It will destroy the strong chest next to Zoe for you. If you don't have enough room for them all, they'll turn see- through and not let you pick them up, you will still be able to pick them up at any later date though so don't fret about it.
| LIGHT GEM 034/100 |
|---|
| Just after a thermal which was created by Dark Gem #15. |
Time to use that thermal. The usual Gnorcs are up here, charge and flame and err flame again.
[ ] - Visit Elder Titan
Glide forwards next and you'll be at the second Moneybags Shop of the level, 'Elder's Homestead'. Wander around to the other side of the building, charge and flame the Gnorc, and ram into the red and white switch on the wall. This will open up the door to Elder Titan who will promptly teach you Wing Shield. Very useful for this level and parts of others.
[ ] - Use Wing Shield
| DRAGON EGG 27/80 - Character Set |
|---|
| At the start of the Wing Shield course behind Elder Titan's house. |
The door behind Elder Titan will open after talking to him and some steps will rise up.
After grabbing the egg, move closer to the Gnorc being held up by a balloon and he'll throw a boomerang at you. Quickly hold Wing Shield and the boomerang should rebound off you and hit his balloon, giving you the gems. This will be required for killing all Gnorcs like him.
| LIGHT GEM 035/100 |
|---|
| At the end of the Wing Shield test. |
Glide to the platform behind where he was and then follow them around to the other end. The path is littered with balloon Gnorcs and those green flying Gnorcs which tend to get in the way a bit.
| LIGHT GEM 036/100 |
|---|
| At the end of the right-hand path at the start of the level, take the right path of that path and you'll find this at the end of a few blue circle platforms. |
Jump down to the start of the mini-course again and back through the Elder's house. And all the way back through to the start of the level again. Horn Dive the other switch now that you've got Wing Shield, use it against the balloon Gnorc straight away. When you get to a split in the path, take the right-hand direction.
| DRAGON EGG 28/80 - Sgt. Byrd Set |
|---|
| At the end of the right-hand path at the start of the level, take the left path of that path. |
Head back to the split again and take the left direction this time. Defeat a couple of balloon Gnorcs.
Watch out though as the egg is on a blue circle platform and the only way off it is to jump onto another platform which likes to go upwards, so time your stay there right. It'd probably be best to wait for your current platform to raise high enough to get onto the platform above the egg, then use the other moving platform to quickly grab the egg and jump back onto it.
Either way, go to the top of the platform where Zoe is. Then jump onto one of two small circular platforms a little off to the south-east of you. These will act as your transport for getting to another platform further along. Standing on one will cause the other to orbit you can so manouvre it into a position ahead, then jump onto the moved platform and repeat all the way to the other end.
| DRAGON EGG 29/80 - Concept Set |
|---|
| A thief on the far south island has this egg. |
Once you finally reach it, head round the back of the building and you should notice a thief with an egg. For some reason if you don't go into the building he won't run much leaving you to simply flame/charge him easily.
| DARK GEM 16/40 |
|---|
| Shortly after the end of the moving platforms, use another similarly styled vertically moving platform to get to it. |
Now, head off to the right where you'll find a new set of platforms to use. This should lead to a platform north-east of you, there are several gems floating along the way. At the end you should find a platform with Zoe and a Dark Gem Shard on it. Go past where the shard was and glide over the gap to another platform with another shard on it. Go into the building and jump up onto the platform sitting there in the middle.
Another fan will be fixed and a new path will arise a short way away. Jump over to it and continue on to Moneybags' Shop 'Tallest Tower'. Use the large thermal over to the left and you'll be up by Sgt. Byrd.
[ ] - Clear Sgt. Byrd's Speedway
| DRAGON EGG 30/80 - Sgt. Byrd Set |
|---|
| Complete Sgt. Byrd's level on Easy. |
Fly through the rings straight ahead all the way, shoot anything you can along the way but don't worry too much at the moment. Once all eight rings are collected, fly through the archway right near the last one, then down to the right for the next, continue on through these arches, through a tunnel and out to another arch with a couple of turrets nearby, destroy all those and fly upwards, you should see another platform in front of you now with another couple of turrets on. Off to the left and destroy the turret on a large circular platform before continuing on to the right where there are a couple more as well as the final two arches. Head over to the other end of the level where you should hopefully find the Balloon-a-rangs all lined up nice and neat for a quick finish. If you still have any birds or turrets to get then I suggest searching the level for them.
| LIGHT GEM 037/100 |
|---|
| Complete Sgt. Byrd's level on Hard. |
Hard Mode is basically the same as easy but harder. The part that's easy to miss is the last of the turrets, it's found on top of one of the platforms, just under the outer rim so you have to be close and higher to see it.
Once you're done with Sgt. Byrd's part, walk down the walkway behind you leading away from Byrd. At the end of it you should find yourself standing over a glass pane with a Light Gem beneath you. You can't get it yet, you'll need Wall Kick in order to do so. Horn Dive the nearby switch anyway, it doesn't really make a difference. Glide forwards to the blackend platform ahead. Try to keep level with the line of gems and once you land, go around to the left and activate a switch. This isn't especially useful except that it opens up a path back to where the as yet unusable supercharge gadget is still sitting near the Elder's house. Anyway, turn around and go inside the place here and use the platform inside to get up to the top.
| DARK GEM 17/40 |
|---|
| On top of a platform after Sgt. Byrd and his maxi-game. |
The Dark Gem will heal the final fan of the level and cause yet another set of stepping stones to appear. Follow those steps over to the Ball Gadget.
| DRAGON EGG 31/80 - Sgt. Byrd Set |
|---|
| Complete the Ball Gadget on Easy. |
| LIGHT GEM 038/100 |
|---|
| Complete the Ball Gadget on Hard. |
You'll be better off holding down speed and forwards for most of the duration of this task, as the timer is very unforgiving. Make sure to watch out for a couple of bumpers that rise up a short way in, and don't use or do anything when you're being bumped along by the large red bumpy things.
'Hard' mode is just a different path with slightly more time. Though I've found it to actually be easier, but since the game doesn't actually call it Hard mode I'll forgive them.
Once you get the Light Gem, select No to exit the Ball Gadget. This brings you out on the opposite side of the level and a single firework to destroy the strong chest at the very start of the level. With 1 Egg and 1 Light Gem still left in the level, there's nothing you can do to get them right now so head on down with the same thing you used to get into Cloudy Domain.
To complete this level when you come back, you'll require 40 Light Gems and the ability 'Wall Kick'. That won't be for a short while now so head on over to the entrance to Sunken Ruins (far west inside dome that rises out of the water). Or you could just buy a teleport pass to Moneybags' Shop 'Waterfall Walkway' instead of using the fan. This is very close to Sunken Ruins and saves a lot of unnessacery walking.
| Items and Tasks |
|---|
| 3 Dark Gems 6 Dragon Eggs 8 Light Gems |
| Destroy all the Dark Gems Collect 24 Light Gems Clear Sparx Shooter |
Directly ahead you should spot a Dark Gem Shard, smash it and go on through to a room with a trident Gnorc and three dogs. As well as that there's a nice locked chest for you to open. It has a couple of Lightning Breath power-ups, definately not worth the 500 gems if you ask me. The door on the left is locked at the moment and won't open for quite a while. Head down the other passageway with another Shard in. You'll find Moneybags' Shop 'Atlantian Entryway' here. Go through the large doors on the left.
 DRAGON EGG 32/80 - Ember Set DRAGON EGG 32/80 - Ember Set |
|---|
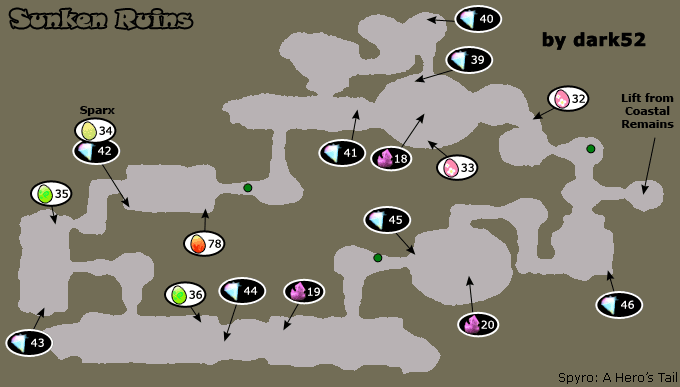
| Inside a locked chest after the water section which is right after Moneybags' first shop here. |
Jump into the water here and swim through following the line of red gems. It's not exactly a maze down there so go collect other gems whilst you're down there too. When you emerge from the water, you should be in a small room with another trident Gnorc in as well as a locked chest and a large door on the other side, most likely the way you'll be facing.
| DARK GEM 18/40 |
|---|
| Inside a room after the first water section of the level. It turns on a series of thermals. |
Once you've picked up that egg, head through the large doors to a room filled with several metal chests, a few strong chests, quite a few Dark Gem Shards and one large Dark Gem. Smash it!
| DRAGON EGG 33/80 - Ember Set |
|---|
| At the top of a set of four thermals in the room with Dark Gem 18. |
Jump into the thermal that just got switched on and wait a short period before gliding forwards to another thermal that will appear. Repeat this process with another two thermals.
| LIGHT GEM 039/100 |
|---|
| Up near Dragon Egg 33 at the top of a series of four thermals. It's inside a locked chest. |
If you glide around up here you should find a whole load of gems ripe for a collecting as well as a firework to destroy the strong chests below, oh and a locked chest too.
| LIGHT GEM 040/100 |
|---|
| In a locked chest behind the mermaid Lily. |
Jump back down to the ground again and collect those gems, then go up the nearly invisible stairs to a large keyhole shaped doorway on the opposite side, you'll find a passageway with a Shard in it as well as a mermaid sitting at the edge of a pool of water.
Talk to Lily and she'll tell you to follow some markers, I believe she's referring to a line of gems, but I'm not sure. But whatever, follow the line of gems if you need guidance of getting through this underwater section, it's not all that difficult really it's just full of gems and a few enemies.
[ ] - Collect 24 Light Gems
Once you get out the other side, kill the large blue crab and talk to the hologram of the Professor. If you have enough Light Gems (24) then you'll be able to power the Invincibility Gadget. It's only temporary and runs out quite quickly, if you want to proress all the way through the level I believe that you need to use this at some point, though the reason for it being here is a completely optional Light Gem.
| LIGHT GEM 041/100 |
|---|
| In a small room after the first green water section, use the invincibility gadget to swim through to it. |
Use the gadget and dive into the green water which would otherwise kill you, and will do if you don't make it out the other side in time. Quickly turn around and swim along past a couple of turning fans, and jump out of the water as fast as you can as the gadget is designed only to last this long giving you the minimum time to get through.
Don't worry about swimming back though as the Light Gem will open the window next to you back to where the gadget is. Now go along the tunnel on the left of the green pool, guarded by a trident Gnorc. You should fall down to where Moneybags' Shop 'The Depths' is.
Through the door and you'll emerge in an area with several Dark Shards as well as an invincibility gadget, a wall kick that also requires the use of the invincibility gadget, and a Sparx level which is in the far left corner. If you accidently fall down to the layers below, there's an electric platform you can use to get back up again.
[ ] - Clear Sparx Shooter
 DRAGON EGG 34/80 - Sparx Set DRAGON EGG 34/80 - Sparx Set |
|---|
| Complete Sparx Shooter on Easy. |
| LIGHT GEM 042/100 |
|---|
| Complete Sparx Shooter on Hard. |
Another one of those shooting levels. The only real difficult part of this level is figuring out how to open the large circular door things, simply shoot at the chain next to them, it should spin round opening it, make sure to get through before it closes again though. Also getting past the closing doors, slow down to wait for it to close and then as it opens again speed through. Also use the same sort of tactics for getting past a fan near the end of the level, though you should obviously avoid the blades.
Hard Mode is just more of the same but more. Also with a couple of things on the ground and one room full of spiders, other then that it's basically the same as before.
Once you've gotten them both, or one or none, jump down to the bottom of this place and collect up all the stuff down there, smash about a bit and ignore the strong chests, they're related to the currently impossible Wall Kick.
| DRAGON EGG 35/80 - Character Set |
|---|
| Inside a locked chest near the set of fishheads spurting out green flames |
Go through the passageway at the end of this area, and go through into another large room, destory all that is on the ground and then hop up a couple of steps at the end that you came in at.
| LIGHT GEM 043/100 |
|---|
| At the other end of the room with the large fishheads flaming green. |
Make your way to the other end of the fishes, jump over the green 'flames' and get to the other end. Once you've picked up that Light Gem, get onto the electric platform and power it up.
This will take you to an opening in the wall above the fishes. Jump onto the fan powered elevator at the end just past a Dark Shard and let it take you to the bottom, failing that just jump down to the bottom and go on through the passageway/door there. Now comes the first bit with required Invincibility Gadget to continue on, so it you don't have the 24 Light Gems required by now, you'll have to turn around and go search for them in previous levels.
| LIGHT GEM 044/100 |
|---|
| In the long green water tunnel with debris that falls through it. |
If you do have access to the gadget, simply use it and swim to the other end of the green pool. There's not much you can do down there, just avoid the large objects that appear, collect the Light Gem and swim out the other end.
| DARK GEM 19/40 |
|---|
| After a few pole spins which need activating by a couple of switches, this is paired with a green water section too. |
Head into the corner of this room and jump up onto a pole spin pole. Activate the button up after the first couple and it'll release a few more, though unfortunately they're back at the other end of the green water. Head back through, remember to use the gadget first, and then make your way up to where the couple of poles now are. Activate another switch after them, and then head all the way back through the water again.
This should all finally bring you up to where a Dark Gem is planted.
| DRAGON EGG 36/80 - Character Set |
|---|
| Inside a locked chest in the area with a compulsory invincibility section. |
Smashing this will fix an archway below, allowing you to get on with more of the level, though of course there's a bit more to do before doing that. Go through the passage next to you and you'll end up in the first area again, flame the firework to free a load of gems, and then glide over to a locked chest nearby.
Now head back through to the area with the newly created doorway, and go on through. You should eventually find yourself at Moneybags' Shop 'Toxic Rise' before a large door. In case you were wondering whether that referred to the previous section, you're wrong. Head through the door to see why.
| LIGHT GEM 045/100 |
|---|
| Inside a locked chest in the large green pool area. |
Over to the left of the large pool you can see another crumbled doorway that you'll need to get fixed. Go around to the opposite side of the pool where an electric platform is sitting. Jump off it to the site, either left or right, you'll have to do both ways, and Horn Dive the switches on them. These will partially rise a statue out of the pool. On the lefthand one, electrify an orb thing on the wall and then jump over to the now moving pole inbetween you and another place with another switch on, this will allow you to get over to it easily. Then head further around, this time however you can just stand on top of a locked chest to get up to the place with the switch on.
This will again solve a task you haven't been given yet.
[ ] - Destroy all the Dark Gems
| DARK GEM 20/40 |
|---|
| On a statue that rises out of some green toxic water after pressing four switches. |
And once all four switches have been pressed, glide over to the now emerged Dark Gem and smash it.
| LIGHT GEM 046/100 |
|---|
| Inside a locked chest in the final room of the level. |
As before, this will fix the archway all ready for you to complete the level back to the start and to go off and fight Ineptune. Anyway, head through that archway and kill the few enemies through it. When you get to the deadend, you should look up and see a fan elevator that will come down to you eventually. Use it to get to a level higher.
Head over to the other end of the room and jump up to an opening. Horn Dive the switch there and the door will open leading to the very start of the level. Use the elevator to get back to Coastal Remains and go on over to the start area of the level, or just use Moneybags' Teleporter to take you to his main shop which is right near it anyway and is overall just simpler to do.
| Items and Tasks |
|---|
| 0 Dark Gems 0 Dragon Eggs 0 Light Gems |
| Defeat Ineptune Use Water Breath Activate Teleporter |
Walk over to the purple covered entrance to her cave and it'll all recede into nice entrance if you have collected all 20 Dark Gems that you're supposed to have done. And unlike Gnasty's Cave's entrance which had a dragon and egg, Ineptune's Watery Tomb has neither and is just a passageway with a few crabs along the way. Onto the boss fight then!
Nice subtle hint as to her weakness in the opening scene, it's her belt if you were still wondering.
Wander around and keep as far away as you can from her, she'll breathe some green stuff which doesn't reach very far and then yawn, charge into her belt buckle to injure her. One of the sections will now go underwater with her so just stand in the middle part to make sure you're safe, and then an electric swipey thing will appear on the part that just went under, calmly jump over the electricity a few times and wait for Ineptune to return.
She'll throw a couple of green bombs in your direction, simply charge a little out of the way and then she'll repeat her breathing exercises. Again just the one section will go under, this time appearing with what is probably slightly faster and reaches further quicker. Just a simple jumping routine will suffice. Another couple of bombs, another breath another hit and she's 'defeated'. Fear not she'll still continue on, it's just that the place will sink a little further for no reason.
She breathes first so just keep back for that, it's no different any time so the distance required is always going to be the same. Two sections will go under this time so stand on the third and await both to return with electric lasers on. A few double jumps will be all that is required to avoid them, just time it right to jump over both in the same jump. She'll arise again and throw a single large bomb and then breathe again. 'Nother two sections will go, same double jump routine as before. She'll next send two single bombs at you not immediately one after the other but a while after each other, then again with the breathing, another 'victory' is upon you.
Single bomb and breathe in quick succession. Still just the two platforms going under again. And use the same jumping tactics again, though now it doesn't really matter if you're hit as you should have enough hits left to survive to the end as she gets injured when you hit her. A couple of small bombs and then a breath attack. She'll be down to just the one hit now. The two will go under, but this time with a twist. One of them will have a top laser as well meaning you have to time your jumps not to hit it. She'll now bombard you several times with bombs, a mixture of the two and one variety. Then as usual it's breathing time. Charge into her one final time and she's properly defeated at last.
[ ] - Use Water Breath
Aqua, a fairy, will now give you the power of Water Breath. You'll need it to get out. The water has also turned blue meaning you can now swim in it, though there's little reason to. Go through the exit door and use the water breath on either of the two water wheels there.
| LIGHT GEM 047/100 |
|---|
| Above a waterwheel, it requires Water Breath to be able to get it. |
Before going to the next realm you can get one more Light Gem in Coastal Remains to finish it off. Head to the southern water area of the level and jump up onto a platform next to a waterwheel with a Light Gem above it. Use the water breath on the wheel and the platform you're standing on will spin around.
[ ] - Activate Teleporter
Now head over to the Professor's teleporter and use it to get to the Icy Wilderness Realm.
The following is written for your return to finish off previously incompletable levels, it's described as of just before the final boss with all the abilities and items collected up to there.
| Sunken Ruins |
|---|
| 1 Dragon Egg |
| DRAGON EGG 78/80 - Flame Set |
|---|
| Use a set of hot pipes to wall kick up to this, just after the shop 'The Depths'. |
Teleport to the shop 'The Depths' in Sunken Ruins. Go through the door and straight into the invincibility gadget. Over in the corner is a couple of hot pipes that will allow you to wall kick on them whilst invincible. Once at the top, set off a rocket and then jump over to a trident Gnorc in the corner before running along to the egg.
Collect those gems and then head back to Moneybags' shop again.
| Cloudy Domain |
|---|
| 1 Dragon Egg 1 Light Gem |
Teleport to 'Elder's Homestead'. Just off and around to the left you should find a supercharge gadget with which to destroy the strong door on the platform just to the left of the shop.
| DRAGON EGG 79/80 - Character Set |
|---|
| Inside behind a strong door near the Elder's Homestead. |
| LIGHT GEM 099/100 |
|---|
| Inside a platform after Sgt. Byrd, use a thermal and a wall kick. |
Teleport to the shop 'Tallest Tower' and at the nearby thermal, glide down to underneath a place on the right, it has a fan and thermal there. Use the thermal to get inside it. There's a wall kick feature in here to use to get up to the Light Gem.
Now, jump back down to the thermal and wait for a moving platform to come down in order for you to get back up to Moneybags' shop. Teleport back to the Coastal Depot and then to the Icy Wilderness.
Comments

does any one know where the last Flame egg is? i have 7 but i do not know were it is.
Thanks!
StarCats25
I Want to know how too make Spyro Invincible. I did it ones but I do not know how I did it. Nothing hurt me but now I do not know how to put the cheat again. Can someone help? And how do you make him a dark spyro?


Is this you want to know, or already know? Either way, I did not discover the trick. Lyndadragon (or something close) discovered it. They were most kind to post it up on youtube, for all others to see. Type in 'Spyro: a hero's tail.' go through all the pages till you find 'another way into ineptunes lair.' VERY usefull, if i do say so myself.
-CLL
Its really hard .
-Renee
That, if you don't care if you get 100% (includeing any eggs that may be found: you just wanna get to the end of the game), there's a nifty little trick that helps you get into Ineptunes lair WITHOUT getting the dark gems. Anyone wanna know?

All off-topic comments will be deleted. Please do not use the comments system for conversations, instead use the provided forums for the game.
Please login or register a forum account to post a comment.
 darkspyro
 net
net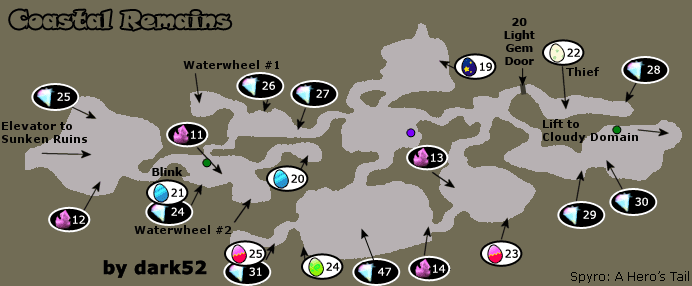
I'm hoping to buy a new one soon