
Volcanic Isle
| Items and Tasks |
|---|
| 1 Dark Gem 2 Dragon Eggs 2 Light Gems |
| Destroy all the Dark Gems Locate Molten Mount Stop the Gnorc Invasion |
The usual introduction scene, with the Professor asking you to go and go to Red's secret underground lair which he believes is in ths realm. He also mentions about going there himself. As a side note, parts of the music in this level sounds very similar to a level in Crash Bandicoot 2, not the whole of the music, just parts.
The water surrounding the teleporter is all but empty, a few gem vases but nothing of real value. Go over to the Dark Gem Shard to the left of where you get teleported in. Smash it and then kill a few bear traps nearby, going through repeating all the way through to the end.
Jump over to the platform ahead of you, the water below is perfectly safe to fall into so don't worry 'bout that. There are also several barrels and crates around here that act just like Horn Dive chests and other related gem giving Horn Dive items. You can see a faint circular pattern on the top of them. Go to the left side of this place and glide forwards again. Kill the several Gnorcs, round here they've got a new purple armour and some like to respawn new Gnorcs upon dying, and cross the bridge to where a locked chest is (contains gems), and remember to kill the Gnorcs and traps as well though.
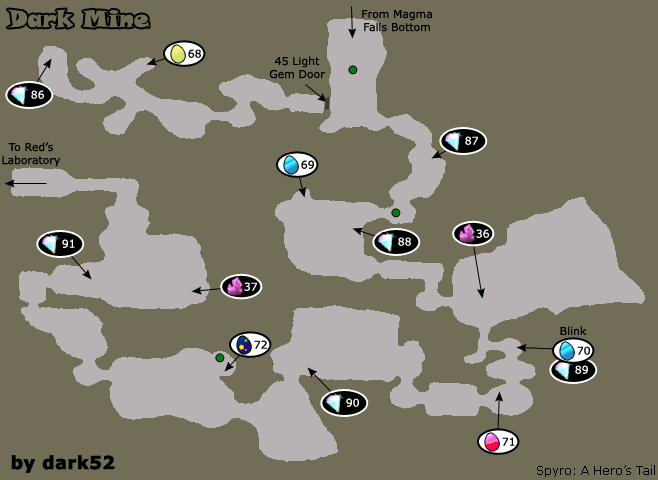
 LIGHT GEM 072/100 LIGHT GEM 072/100 |
|---|
| Up a couple of platforms stuck on the wall in the north part of the west section of the level. |
Go up behind the locked chest to where a firework is sitting. Flame it and then jump up onto the platform held up by rigging to the side.
Glide down to the Dark Gem Shard below, then over a short bridge to a house like building made out of half a ship. On one side of it are the gems from the strong chests that you destroyed with the firework and a locked chest with yet more gems inside. That's all for this part of the level. Head back to where the teleporter is.
 DRAGON EGG 56/80 - Concept Set DRAGON EGG 56/80 - Concept Set |
|---|
| The egg thief is underneath the Stormy Depot. |
Go to the left as you come out of the tunnel and go up to Moneybags' 'Stormy Depot'. From here you may be able to here the usual laughter of an egg thief. Jump over the right side of the ship and charge along northwards, you should soon spot an egg theif to chase. He'll go around the inside and outside of the ship as you chase.
There are also a few gems underneath Moneybags' but as with a lot in this level, there's nothing else. Go over to the opposite side of this area and jump up a box to get to a ship's deck with a large walrus on infront of a gate.
[ ] - Stop the Gnorc invasion
 DRAGON EGG 57/80 - Spyro Set DRAGON EGG 57/80 - Spyro Set |
|---|
| Beat Wally's challenge on Easy. |
Same as it ever was. Kill 60 Gnorcs as they appear to get completion on Easy mode. At the start it's just a few Gnorcs charging towards you from seperate locations, the radar shows where but upon the next wave it's just a constant stream of as many Gnorcs as possible. They don't attack, they merely want to get past you. Shoot constantly and make sure to keep a wide area of shooting as too many Gnorcs past you means you lose.
| LIGHT GEM 073/100 |
|---|
| Beat Wally's challenge on Hard. |
Hard mode justs gives you a larger number of Gnorcs to kill. Nothing wrong with that, 75 shouldn't really be much more of a challenge if you've managed the 60.
Turn right and go to the locked chest, more gems I'm afraid though. What exactly did you expect? You've got all the Light Gems and Dragon Eggs of the level already. Head back towards Moneybags, but on the way, just before his ship, you should see a few step-like boxes covered in a grey sheet. Use these to get up onto a canopy above. Go to the other end and jump to where another Shard is. You may need to jump again off the side of the edge of the place you're aiming for. Go down the tunnel here, avoid the locked chest unless you approve of getting less gems then the key was worth. And just after it, jump down to three more Dark Gem Shards.
 DARK GEM 31/40 DARK GEM 31/40 |
|---|
| Right at the end of the level before Molten Mount. |
The room's full of gems, nothing more. Explore all you like in here but don't expect anything good. Just go through the exit at the other end when you're done. This tunnel has yet more Shards in, though at the end in the second load of them is the Dark Gem of the level.
[ ] - Locate Molten Mount
Destroying that Dark Gem will create a few new platforms and open the way to the next level. Jump across and go into the giant mouth. Without much notice you'll arrive in Molten Mount.
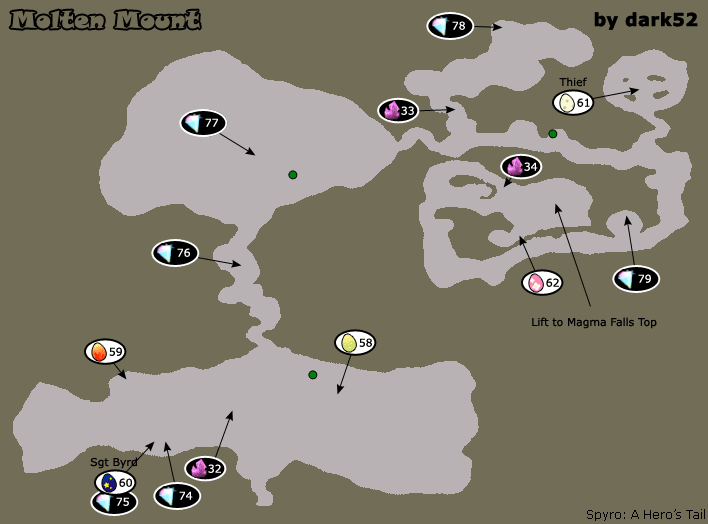
| Items and Tasks |
|---|
| 3 Dark Gems 5 Dragon Eggs 6 Light Gems |
| Destroy all the Dark Gems Climb the Volcano Destroy the Rock Monsters Complete Sgt. Byrd's Speedway |
Shortly upon exiting the entrance, you should see a firework on top of a tree stump. Light it to destroy a Strong Chest stuck up in the wall. Carry on down the path to the end where Zoe and a supercharge gadget are. Use the supercharge to smash up the few strong chests that were on the path before, it runs out really quickly.
Change to water breath and use it against the Fire Bird next to Zoe before gliding down to the platform there. Water another one and glide across when you can making your way to a series of step ups with a box of fireworks and a flaming man thing too. Water down the second one and continue on again to a hyena.
Teena the hyena's house has been burnt down by some rock monsters and she wants revenge! Just around the tree ahead of you is Moneybags' Shop 'Destroyed Village' which you should visit if you ever feel the need to want to come back here.
[ ] - Destroy the Rock Monsters
 DRAGON EGG 58/80 - Sparx Set DRAGON EGG 58/80 - Sparx Set |
|---|
| Recieve from Teena the Hyena after defeating all the rock monsters. |
Much like the Earthshapers of Fracture Hills, these rock monsters cannot be directly destroyed by you. To kill them, as with the Earthshapers, you should charge into them after them slam down their clubs. This will knock them closer to the edge and once they reach the edge, they die. Repeat for all four, you'll need to do them all without dying as they would come back. Once all four are gone, go back and talk to Teena again to get your reward.
| DARK GEM 32/40 |
|---|
| On a platform next to the third rock monster. |
Go back to where the third rock monster was and jump over to that lovely looking Dark Gem.
 DRAGON EGG 59/80 - Flame Set DRAGON EGG 59/80 - Flame Set |
|---|
| Under the small remains of a building near to Sgt. Byrd. |
A nice new bridge of steps appears as well as a counter of fire cowboys. I have no idea why you get it, you just do. Anyway, equip water or ice breath and wander along the bridge dousing the cowboys as you go. After the first three, a wizard similar to that of the one in Gloomy Glacier teleports away. Jump onto the moving platform after where he was and as it moves along through the next three cowboys, douse them too. Again, the wizard will teleport away.
| LIGHT GEM 074/100 |
|---|
| Inside a locked chest next to Sgt. Byrd. |
Jump onto the next moving platform and freeze yourself three more cowboys before reaching the wizard who will promptly disappear again.
[ ] - Complete Sgt. Byrd's Speedway
 DRAGON EGG 60/80 - Sgt. Byrd Set DRAGON EGG 60/80 - Sgt. Byrd Set |
|---|
| Complete Sgt. Byrd's task on Easy. |
| LIGHT GEM 075/100 |
|---|
| Complete Sgt. Byrd's task on Hard. |
Rings, Time-Gates, Targets, Gnorcs and Fire Birds. Nothing unusual here. Just fly around going through things in the order they appear. All the Gnorcs are located behind things at the edges of the level and the birds fly around everywhere. Hard mode just mixes stuff up a bit.
| LIGHT GEM 076/100 |
|---|
| On a platform next to some poles. |
Upon completion, turn around and go back to where that third rock monster was again and now head off towards the opening in the rock ahead. A large Gnorc should spring up as you approach it. I suggest using Ice Breath through here as you can use it offensively on both the cowboys and Gnorcs. Go on past the swinging axe. When you reach a set of poles, go to the left of them and glide down to a platform, getting rid of the fire cowboy as you do.
Jump back and use the poles to spin on. Jump at times when the fire is either gone out or is just about to, hitting it hurts you know. Go past Zoe and jump down, spraying water at the fire bird as you do. A couple more jumps will get you to the shop 'Collapsed Bridge' next to some sort of broken structure, I'm not entirely sure what it was though. A little further ahead you'll find a cannon all lined up for a shooting, though you'll have to move it around a little to aim for the large cracked rock just a little to the left.
| LIGHT GEM 077/100 |
|---|
| After the second set of nine fire cowboys in the area with the 'Collapsed Bridge' shop. |
Next, carry on forwards and to the left so you go up a set of pole spins. Keep going around jumping over platforms and wiping out the fire birds until you reach a much larger platform and a new 9 cowboy counter appears along with several cowboys surrounding the wizard. If you get close he'll fly off just a short way away and when you destroy the first four cowboys another five appear. On completion, where the wizard was standing is now a Light Gem.
| DARK GEM 33/40 |
|---|
| Down to the left of Zoe in the middle area at the top of the map. |
Glide back to Moneybags' shop and go off to the right at the poles this time. Jump and freeze a lot here, charge into their frozen bodies to get their gems if you feel so inclined. When you get to Zoe, glide to the left, this'll lead to a Shard and Dark Gem.
| LIGHT GEM 078/100 |
|---|
| Above a set of three platforms, raised individually by three seperate switches with a time limit. |
Head through where the lava flow just stopped and go to the right of Zoe here. Glide down to the platform with a red and white switch on. Activate it the switch and glide to the right where another switch is. Activate and then activate the last remaining switch on the other platform before racing to get up those three raised platforms.
And for a few more gems before leaving, make sure to glide around the right corner, hugging the wall as you go. Wondering what that invincibility gadget was there for? Well it's to get back up to Zoe and the rest of the level, as otherwise the jump is just that little bit short causing you to fall into the one-hit-kill lava. Anyway, proceed with the exiting of this area and go to the left as you get back out. This path will meander past the shop 'Lumber Storage' and lead you to a broken bridge with a lot of fire coming out of the lava. Glide over the second it subsides. Destroy the fire creatures here that like to popup almost as you walk over them then head up to Zoe and into the cave behind her.
| DRAGON EGG 61/80 - Concept Set |
|---|
| An egg thief in the north-east corner of the map. |
The almost mazelike area you find yourself in is home to an egg thief who will run around and around in circles.
| LIGHT GEM 079/100 |
|---|
| Inside a locked chest that's behind a cracked wall after some spikes that rise and fall. |
Once again, head back out of this area and continue on with the level to the left as you reach Zoe. Wander along past swinging axes and poking spikes. Just after them, a wall to your right should be cracked and give way with a quick charge.
 DRAGON EGG 62/80 - Ember Set DRAGON EGG 62/80 - Ember Set |
|---|
| Inside a locked chest behind a cracked wall just after the cracked wall of Light Gem 79. |
And on you go! Just past Zoe again you will find another cracked wall with another locked chest in.
| DARK GEM 34/40 |
|---|
| Right near the end of the level. |
And that's the last of the Ember Set. There's another cracked wall inside this area, but only leads to gems. Take a right out of the cave and go up some steps. Dodge the falling rocks as they fall, slightly off-centre should be safest. There's nothing much special to deal with for a while now. Just carry on down the straight-forward path until you reach the last Dark Gem of the level.
This will bring up a wall kick feature just past it, go up it, glide over to Zoe and step onto the small elevator next to her before activating it to get down to Magma Falls, a level of three parts.
| Items and Tasks |
|---|
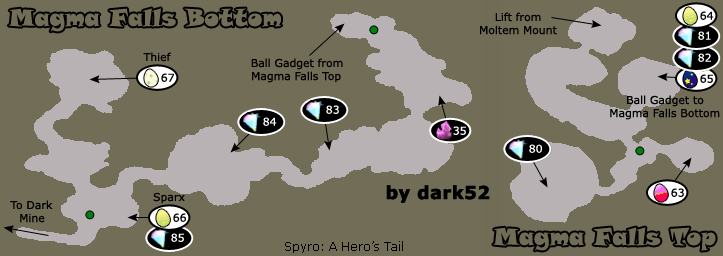
| 1 Dark Gem 5 Dragon Eggs 6 Light Gems |
| Destroy all the Dark Gems Complete Sparx challenge |
This level is special. It has two maps, seperated by a Ball Gadget, but has the same Egg and Gem counter for both, slightly confusing but whatever.
| DRAGON EGG 63/80 - Spyro Set |
|---|
| Inside a locked chest in a hidden area right next to Moneybags' shop. |
| LIGHT GEM 080/100 |
|---|
| Guarded by a fire bird in the southern section of the level. |
| DRAGON EGG 64/80 - Sparx Set |
|---|
| Take the first right in the Ball Gadget. |
| LIGHT GEM 081/100 |
|---|
| Take the next right in the Ball Gadget. |
| LIGHT GEM 082/100 |
|---|
| Take the next right in the Ball Gadget. |
| DRAGON EGG 65/80 - Sgt. Byrd Set |
|---|
| Take the left instead of the previous right in the Ball Gadget. |
Go straight through the gap ahead of you, and follow the path around to the right. Take out the rock monster here in a similar way to previous ones, ie charge into it to knock it to the edge. Water the fire creature here and continue upwards and onwards. When you get to a split in the track, take the right, as the left leads to the Ball Gadget which leads to the next part of the level which takes you away from this part of the level which isn't finished yet! Straight away upon going right you'll reach Moneybags' shop 'Crackling Cave' and right next to that you should be able to see a wooden set of planks covering a Gnorc behind it. Smash into said planks to get into the area there.
There is another locked chest near the shop, but it has only got one piece of ammo in and isn't really worth opening. Continue on down the corridor to the room at the end. On the side with a piece of lava being fired at the wall kick, use the wall kick to get up above it. Jump onto a platform just a little higher, water down a fire bird and glide over to the Light Gem behind it.
Make your way back to where you went right instead of left, and go left into the Ball Gadget. This thing requires either a lot of self sacrifice or for you to repeat the entire thing over again once you've gone through it once. You'll probably end up going through it twice really, one default track, the other a choice.
Unfortunatly the Ball Gadget is hard to describe without being really boring and missing out a lot of detail, as well as being difficult to follow, so I'll just list the items you can get from it. Remember to take each and every alteration of direction at least once.
And upon reaching the end, you'll be brought out at the bottom of Magma Falls.
| DARK GEM 35/40 |
|---|
| Above a Wall Kick at the start. |
Straight ahead is Moneybags' Shop 'Chains of Lava'. Straight ahead you'll find a couple of stepping stones with accompanying fire creature. Just jump and attack to get past them as usual, then take out a Gnorc and jump up the Wall Kick.
| LIGHT GEM 083/100 |
|---|
| Inside a locked chest shortly after several firey blockades. |
That's the one and only Dark Gem in this level. It opens up a way to continue on as well. The only thing of notice for a while is a locked chest just after the next Zoe.
| LIGHT GEM 084/100 |
|---|
| Just below where the Wizard was. |
Again, shortly along the corridor a counter for fire cowboys appears and as you round the corner you will be able to see the familiar wizrd standing up on a platform above. Follow the fire creatures around and up towards said wizard, who will once again teleport away upon the defeat of the final creature.
On with the level! The next area you arrive in should have a firey pit in the middle. On the left is the final Sparx challenge for you to play.
[ ] - Complete Sparx challenge
| DRAGON EGG 66/80 - Sparx Set |
|---|
| Complete Sparx's challenge on Easy. |
| LIGHT GEM 085/100 |
|---|
| Complete Sparx's challenge on Hard. |
Finally they've made it different. No more spiders, instead you've got those fire creatures to worry about. Avoid the flying pieces of molten rock and shoot as many bugs as you can be bothered to do. Right at the end you'll find yourself faced with something very similar to that of the speedways of Season of Ice. A large fire bird is surrounded by fire creatures, you need to destroy all the fire creatures around it before you can destroy the fire bird. Upon this destruction you win.
Hard mode just adds a few more obstacles and falling objects to the mix.
| DRAGON EGG 67/80 - Concept Set |
|---|
| The thief is in the north-west part. |
Just the one more Dragon Egg and this level's complete. Wander over to the shop 'Sparx Can Fly' but don't go down the passageway behind it as that leads out of the level. Instead take the passageway that you didn't come in by, the northern one. You will eventually end up in a large room filled with lava and a structure with a path going around it. Unfortunately this is a thief chase area. You will need to chase it around jumping over a couple of gaps along the way, one of which spews fire every now and then. But as usual the thief is pretty dumb and you should catch it quite quickly.
Once you've gotten that, go back to Moneybags' shop and continue down the passageway behind it, leading all the way to Dark Mine.
| Items and Tasks |
|---|
| 2 Dark Gems 5 Dragon Eggs 6 Light Gems |
| Destroy all the Dark Gems Access the Laboratory Let Blink explore Collect 45 Light Gems |
As you reach the map, you'll immediately pass the Collect 45 Light Gems task as long as you already have 45 Light Gems. Go past Zoe and destroy the Shards around 'Mine Mouth' the shop. Oh, and the best breath to use around here is the Elecric Breath as the place is full to the brim with robots though for the dog things, use fire breath. Go on past the shop and take out a few of those dog things, as well as a couple of robots that will require two attacks with the electric breath as the first will just take off their legs. The locked chest here just has a few gems inside.
| LIGHT GEM 086/100 |
|---|
| Second left in the green water, which is in the secret area. |
| DRAGON EGG 68/80 - Sparx Set |
|---|
| First right in the green water, which is in the secret area. |
If indeed you do have the 45 Light Gems required, go through the secret door next to that locked chest. Straight away you'll want to kill the robot getting ready to attack you, go through to a few dogs and Dark Gem Shards. Carry on along taking out a few more dogs, traps and a large robot until you reach a green pool with an invincibility gadget next to it.
If you're running low on invincibility get out fast as you will die if you're down there and it runs out. Apart from the egg and Light Gem the place is only home to gems and a few shards, so upon getting them both, exit this oh so secret of areas.
| LIGHT GEM 087/100 |
|---|
| Inside a locked chest just after the 45 Light Gem door. |
Along the main path again, avoid the several purple steam vents to get to a locked chest, within which resides a Light Gem.
 DRAGON EGG 69/80 - Blink Set DRAGON EGG 69/80 - Blink Set |
|---|
| Inside a locked chest reachable by a moving wall kick feature. |
Go past another set of vents blocking a door to the shop 'Hidden Depths'. Attack the robot standing in the deadend, then charge into the rock wall he was guarding. Jump down to a Dark Gem Shard, light a firework, and then over to a hovering platform in the middle of the area before jumping over to where the firework went. There are a few moving barriers, go inbetween the first and third parts of this as they go back in, and when they come back out again use them as a wall kick feature to get up to that laser-wielding Gnorc. Then glide over to a locked chest ahead.
| LIGHT GEM 088/100 |
|---|
| In the area with a moving wall kick, reachable by a high up platform. |
Now, go back to the top of the wall kick and glide to a high up platform back along above the previous floating platform. Then jump over a short wall of pipes to a Dark Gem Shard and a Light Gem.
Jump down and head back towards Zoe to get your progress saved, or just carry on past the laser robot. Watch out though as the floor in here crumbles, you'll need to be light on Spyro's feet jumping quickly all the way through before smashing down another rock wall. You'll arrive at another Zoe with some shards around her. Go into the next room and to take out the robots on the cannons, you need to just get side on and electrify them.
| DARK GEM 36/40 |
|---|
| In the centre of the room with robots on cannons. |
You'll need to destroy the central Dark Gem in order to get any further with the level.
This'll crumble a pipe so you can now go along it. A short way down it Zoe will zap you, turn and go towards the one and only, Blink.
[ ] - Let Blink explore
The usual setup, five for 'easy', ten for 'hard'. Grab all the gems you want and await a vertical platform to arrive to take you across to some monkey bars to use. When you get to the other end, drop off and then wait for a platform to arrive, you'll need to hang onto the bottom side of this one. It'll take you over to the first Shard, though as you don't have any bombs yet, dig through the wall at the end to get some, then come back to destroy it. Now drop down to the area below you. You'll find plenty of spiders here as well as a bomb dispenser and a Dark Gem Shard.
You'll need to take the path along the lava. Jump to each of the stones, some are much more difficult to get to then others so jump as they're moving towards each other, also make sure not to jump as a flying rock flys.
At the other end you'll get to an area filled with spiders as well as another Dark Gem Shard. Once cleared, jump onto the waiting platform to be whisked away right back to the start again. Head all the way back to where you dug through the rock, do so again.
Jump down and kill the spiders before throwing a bomb at the cracked wall. Kill another couple of spiders and then go and destroy a Dark Gem Shard in the next room with another couple of spiders in. One of these returns quite quickly so throw a bomb at the shard fast.
| DRAGON EGG 70/80 - Blink Set |
|---|
| Complete Blink's challenge on Easy. |
Once done, head back to where the cracked rock was and wait for a platform to arrive from above. This will take you up to another platform, drop onto it, shoot some spiders (HARD: There's a Dark Shard behind the top spider) and get up to a slightly higher platform next to you which allows you to grab onto the monkeybars above it. Swing across, dropping a bomb at the cracked wall below as you go. Drop down to where the rock was and use the couple of platforms to get across to a wall kick feature. Throw a bomb at the cracked wall ahead, then use the wall kick, use the platforms to get to the other end. Jump down to the spider filled area below. Quickly make your way over to the opposite end where the final Dark Shard lies. End of Easy, the rest is Hard.
| LIGHT GEM 089/100 |
|---|
| Complete Blink's challenge on Hard. |
Dig through the wall here and collect some more bombs from the dispenser. Make your way across the lava filled room, jumping from platform to platform right to the end where you use the wall kick to get up. Punch a couple of large blue bugs up there and destroy the Shard. On the left now, a moving platform should arrive down to take you to the platform above you where yet another Shard is sitting. Cross over the lava again but higher up this time, you'll find a shard right at the other end. Jump back to the platform just before it and then jump down to the layer below. Quickly rushing towards the final Shard at the end.
| DRAGON EGG 71/80 - Spyro Set |
|---|
| In a cave underneath the path just after the elevator after Blink. |
Go through to the right now, back as Spyro, and wait for the lift to descend. Go through the door at the bottom and take care of the shielded robot Gnorc before jumping over to the Horn Dive chest. Turn and jump down to another platform with a wicker basket on it and then into the cave with a Dragon Egg in.
| LIGHT GEM 090/100 |
|---|
| In the far corner in the area with all the vents to turn into poles. |
The last of the Spyro set, and since you've got only nine eggs left to go, you'll be finishing off sets in quick succession now. Jump back up to the main path again. Continue along until you reach Zoe, there are a few gnorcs and things inbetween but they should be easy to take care of. Drop down and equip freeze breath. The platforms here will fall if you stand on them too long, so keep jumping, even if it's just jumping on the spot. To get anywhere really, you'll need to freeze the steam vents in order to turn them into poles to spin on. After the double frozen poles you can either go left or straight on. Go straight on at the moment and work your way down to the Light Gem in the corner.
Now head back, freezing some vents this time to the solid platform, go to the right now unless you want to go get that load of gems, in which case go forwards and then come back here once you've got them. Carry on round and to above where that Light Gem was, take out the couple of robots here. The one by the rock wall isn't actually guarding anything as the rocks are solid this time, continue on down the path until you get into a room filled with rectangle platforms with a blue neon border.
| DRAGON EGG 72/80 - Sgt. Byrd Set |
|---|
| Right next to Moneybags' shop 'Miner's Drop'. |
Go straight forwards, not down, and to the platform ahead with a robot wandering around on it. Kill the couple of robots here before going to the right when you reach the locked door. Follow the platforms over to Moneybags' shop 'Miner's Drop' and the last of the Sgt. Byrd eggs.
| LIGHT GEM 091/100 |
|---|
| On a platform above the switch activated wall kick feature. |
Turn around and look down, you should be able to see a red and white switch to Horn Dive. Jump down to it and activate it. This will open up that locked door and start a 45 second countdown before it closes. Quickly make your way up the series of platforms back up to the door and go through. Go on down the path all the way to a switch. Activate it and use the now close together blocks to wall kick your way up. Jump onto the pole spins infront of you and get to the second set of them. Make your way up to a platform opposite where the Dark Gem is and then glide over to the Light Gem.
| DARK GEM 37/40 |
|---|
| Right at the end of the level, after a series of moving pole spins. |
Once you've got that, head back and pole spin to the Dark Gem.
This brings in a few new platforms in order to get you around the rest of this area. Ignore the first one and glide to the second, then a third which is only visible by the yellow and black stripes on its profile view. Jump up to the platform and the game should bring up the Dark Mine level onscreen summary. Carry on down the rest of the level and into Red's Laboratory by way of another switch operated Wall Kick feature.
| Items and Tasks |
|---|
| 3 Dark Gems 3 Dragon Eggs 5 Light Gems |
| Destroy all the Dark Gems Defeat Red (Again) |
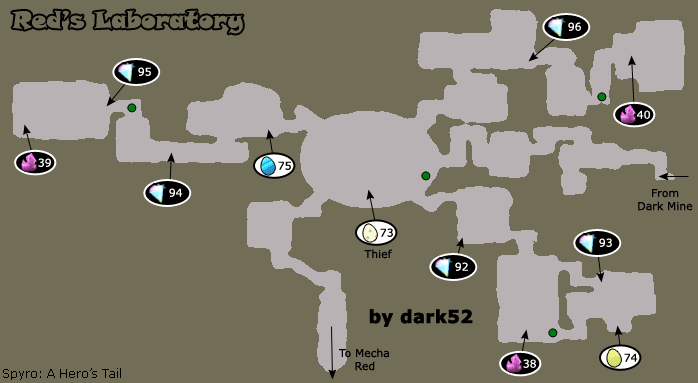
As soon as you get a sudden change in music, you've arrived. Carry on down past Zoe and into an area with several robot Gnorcs. Take them out and go through the door on the right. The switch in the corner activates and allows you to get to a few gems, no special items.
Anyway, through the door, go along the corridor activating the pressure sensitive switch as you go into a larger room with four charge switches, activate all four within ten seconds to open up a wall kick feature. Go up the wall kick and glide over to the opposite side of the room, where at the other end you'll find a locked chest which houses 500 gems. Not exactly great.
| DRAGON EGG 73/80 - Concept Set |
|---|
| A thief in the orrery room. |
Jump back down and continue on through the door and go through an area with several unsteady platforms similar to those used in the previous level but they look like the tilting platforms, there's quite a long jump on the last one before reaching Red's Orrery which locks and unlocks all the doors in this room, talk to Mergatroid to hear all about it. Basically, the door with the light shining at it is unlocked. Step on the left switch to turn the light to the left, and the right to turn it to the right. Simple. Step on the left switch. But before you go through that door, you should chase a thief around the orrery, he's first just beyond the door that you just unlocked.
| LIGHT GEM 092/100 |
|---|
| In the first room of the first left part from the orrery. |
Clear the room of the couple of robots, and then get onto the small platform that goes up a short way. Jump onto the top of a machine closest to the door and use the green pole ahead as a pole spin. Glide to the other side of the room and then run along to the other end of this platform. Turn to the right and glide over to where a large robot is standing infront of a Light Gem.
| DARK GEM 38/40 |
|---|
| At the end of the first door to the left in the orrery. |
Glide back to the previous platform and go through the corridor there and into another room. Activating the switch will open up a Dark Gem for destruction, though you need to get there first, and fast. Jump over the yellow lasers and through the flickering red laser. When you get to the green lasers you'll need to ride a moving platform. Make sure to jump over the moving green lasers as they move. Get to the end before the minute is up and Horn Dive the Dark Gem.
| LIGHT GEM 093/100 |
|---|
| In the room off from 'Laser Leaps', light a boiler in order to get here. |
Go through the door here next to Moneybags' Shop 'Laser Leaps' and fire up the boiler directly ahead. Once you've killed the several robot Gnorcs in here, use the now moving platform to get up and then glide around to where the Light Gem was shown to be.
| DRAGON EGG 74/80 - Sparx Set |
|---|
| Behind some green lasers in the room just off from 'Laser Leaps'. |
Now use a couple of pole spins to get over to a platform across the room, follow a series of platforms around to where another Gnorc is shooting at you, wait for him to shoot before jumping as otherwise he'll shoot you down in mid-air. When you get there, stand in the blue square.
Sparx complete! Tread on the pressure switch to close off the lasers for a short period, rush through and then head back to the orrery via a door at the other end of the room which leads out to just before the laser jumps. Turn the light two more to the left to unlock the one leading west on the map, the one between them leads to Red which you can't get to just yet as you still need another two Dark Gems.
| DRAGON EGG 75/80 - Blink Set |
|---|
| In the top corner of the room first off in the west part of the map. |
Go through into the now open corridor and along into a room with several shooting robot Gnorcs. Wipe out all of them before jumping onto the first of the rising pistons. As it rises the larger one should start falling, use this to glide over to it and get on top. Then use some blue platforms around the edge of the room to get to the other end, activate a switch along the way though, where a Dragon Egg is sitting. Watch out for the Gnorc next to it though as he'll shoot at you.
| LIGHT GEM 094/100 |
|---|
| At the end of a section of green lasers in the western section of the lab. |
And yet another complete set, only three sets to go! You should have opened up the door with that switch, so go through it to where another Mergatroid is standing, no reason really. Carry on down the corridor into what is basically still a corridor. Destroy the few robots in here and near the door at the end is a fast moving platform that you need to get on. At the top, jump onto another platform. This will move along underneath some green lasers, however you will need to jump over these green lasers. Unfortunately if you fall off you'll have to wait for it to come all the way back again. Time your jumps so that you are in the air just long enough for the platform to get safely underneath the lasers so you can land again.
| DARK GEM 39/40 |
|---|
| At the end of the western section. |
After getting the gem, jump down to the ground again and go through the door at the end to get to Moneybags' shop 'Mechanical Mishaps'. You'll emerge in what is the most lablike room of the level. Drop down into the pit at the end of the room and activate a switch there. Quickly charge around the corner ahead and use a green neon bar as a pole spin. This will take you up to a platform with a machine slamming down onto it, avoid these and charge along making your way up the platforms all the way back up to where the Dark Gem was unveiled.
| LIGHT GEM 095/100 |
|---|
| Above the entrance to the same room as Dark Gem 39. |
Jump onto the green pole spin here and make your way up a few of them. At the top glide off to the left and land on a platform quite high up. Jump over onto the top of the lab section and then over to the Light Gem above the entrance.
Back out to the orrery now and open the next door, by pressing the left button once more. In the first room you come to, kill the Gnorcs, jump onto the electric platform and activate it. Jump over to the switch guarded by a large Gnorc and activate it to open up the ground door.
| LIGHT GEM 096/100 |
|---|
| Use invincibility to go along a conveyer belt and then use a wall kick to get to this. |
You should arrive in a long room with an invincibility gadget at the lefthand end. Go into the gadget and charge along the conveyer belt straight through the lasers to the other end. Jump up the wall kick in here and meander around to the final Light Gem of the level.
| DARK GEM 40/40 |
|---|
| At the end of the northeast section. |
There are a few gems at the opposite end, use the poles to spin over there if you feel the need to collect them. Otherwise, head through the door below you. This takes you through to a room filled with yellow and red lasers. Double jump over the yellow ones, and just jump over the red ones all the way to the end door, go through to the shop 'Pre-production'. Now just wander along the rest of the way to the Dark Gem.
This will stop the final production line, and is the very last Dark Gem of the game and the last collectable of the level. You now have two choices. Either go and fight Red for the last time now, or clean up the mess left behind in previous levels and get 100% upon defeating Red. For the purposes of the walkthrough, I'll be doing the latter.
Go back to 'Pre-production' and buy a ticket back to Stormy Depot. Then use the main teleporter to take yourself back to the Dragon Kingdom.
| Crocovile Swamp |
|---|
| 1 Dragon Egg 1 Light Gem |
| LIGHT GEM 097/100 |
|---|
| Inside the pyramid, smash the strong door to get in. |
Teleport in to the shop 'Perilous Pyramid'. Right next to you, underneath the pyramid is a strong door. In order to break it down you need to go along past the pyramid and down the slope under a tree root. You should find the Professor's now activated supercharge gadget here. Smash the door down using this. Inside you'll find several strong chests and the Light Gem.
| DRAGON EGG 76/80 - Concept Set |
|---|
| Inside the electricity powered section, the thief is right at the opposite end. |
Now teleport to the shop 'Forgotten Temple'. Go inside the temple and to the right, you can now activate the electric nodes to open the door. You should find an egg thief at the very end of the section.
| Dragonfly Falls |
|---|
| 1 Dragon Egg 2 Light Gems |
| DRAGON EGG 77/80 - Concept Set |
|---|
| An egg thief in the secret area. |
Teleport to the shop 'Steep Canyon', and go straight forwards along the path until you reach an area with a large drop beneath and several small platforms to get across with. Jump over the platforms and take the path to the right. Just along here, jump up onto some boxes and then up onto a platform above them, the 70 Light Gem door is right here. In the following area, glide into the waterfall in order to get past to the shop 'Secret Area'. Carry on down the path and over the bridge to where an egg thief is, he'll run through paths around the bridge.
| LIGHT GEM 098/100 |
|---|
| Behind a cracked wall in the secret area. |
After that, head a bit further along the path and smash down a cracked wall. Along to the end is a Light Gem, but watch out for the bats, flame them before they hit you.
Another set and level completed. Now head back to the Village Depot and go to the Lost Cities Realm.
| Sunken Ruins |
|---|
| 1 Dragon Egg |
| DRAGON EGG 78/80 - Flame Set |
|---|
| Use a set of hot pipes to wall kick up to this, just after the shop 'The Depths'. |
Teleport to the shop 'The Depths' in Sunken Ruins. Go through the door and straight into the invincibility gadget. Over in the corner is a couple of hot pipes that will allow you to wall kick on them whilst invincible. Once at the top, set off a rocket and then jump over to a trident Gnorc in the corner before running along to the egg.
Collect those gems and then head back to Moneybags' shop again.
| Cloudy Domain |
|---|
| 1 Dragon Egg 1 Light Gem |
Teleport to 'Elder's Homestead'. Just off and around to the left you should find a supercharge gadget with which to destroy the strong door on the platform just to the left of the shop.
 DRAGON EGG 79/80 - Character Set DRAGON EGG 79/80 - Character Set |
|---|
| Inside behind a strong door near the Elder's Homestead. |
| LIGHT GEM 099/100 |
|---|
| Inside a platform after Sgt. Byrd, use a thermal and a wall kick. |
Teleport to the shop 'Tallest Tower' and at the nearby thermal, glide down to underneath a place on the right, it has a fan and thermal there. Use the thermal to get inside it. There's a wall kick feature in here to use to get up to the Light Gem.
Now, jump back down to the thermal and wait for a moving platform to come down in order for you to get back up to Moneybags' shop. Teleport back to the Coastal Depot and then to the Icy Wilderness.
| Frostbite Village |
|---|
| 1 Dragon Egg 1 Light Gem |
Both collectables are to be found behind the infamous 95 Light Gem door, and with 99 Light Gems already collected that shouldn't be too much of a problem. Go to the shop 'Eskimole Village' either walk or teleport, doesn't make a difference. Use the wall kicks on the left to get up to the door. As you approach it, the door will swing open.
| DRAGON EGG 80/80 - Character Set |
|---|
| Inside a locked chest in the area beyond the 95 Light Gem door. |
Take the boxes to the right, defeat a Yeti and go over the bridge to an armoured Gnorc. Then glide to a platform on the right with a locked chest and a snowman next to it.
If you're in need of a key then smash the snowman and kill the Gnorc that pops up. Go back a bit and take the path to the left this time. Just carry on down, use a few poles, defeat a few Gnorcs and you'll get to the last area. If you go down to the ground level here, don't fall into the trap of Horn Diving the cracks in the ice, it'll only kill you.
| LIGHT GEM 100/100 |
|---|
| At the end of the area beyond the 95 Light Gem door. |
Glide across to an invincibility gadget infront of a locked gate and jump onto some platforms hovering above the ice below. Follow these around all the way, past a second waterwheel and all the way to the other end of the area where the Light Gem resides.
To get out, just use the tunnel next to the second waterwheel. The waterwheels themselves would have only been useful if they had used a finite supply of gems, which was likely scrapped after creating this level and so they just left these in along with the invincibility gadget to get under the water which again is pointless otherwise, though of course they might just be there for fun.
Teleport back to the orrery room, 'Celestial Show', and unlock the final door.
| Items and Tasks |
|---|
| 0 Dark Gems 0 Dragon Eggs 0 Light Gems |
| Defeat Mecha-Red |
Approach the Dark Forcefield and watch as it turns off. Scamper along through the doorway to Red's Lair! Quick conversation with the Professor, with him blaming himself for the new better Gnorcs. Red wanders in and starts up a fight with Spyro, not without showing off his Mecha side. Luckily the Professor is there to help and enlarges Mecha-Red. Battle Start! Note that if you die at any point, you'll have to start over with Red at full health.
Red immediatly drops a few things at you, dodge them by charging to the left. Once they've all exploded he'll stomp, sending out a shockwave to jump over. He'll then start shooting a green laser out of his eyes, avoid that for as long as you can, don't go too close to Red though, and he'll eventually turn back into normal Red and several rockets will appear around him. If you didn't quite manage to get him to be hit by all the rockets you'll have to repeat that and do rockets again. Once he reachs 2/3 life left you'll move on to the second stage.
More bombs, and then another stomp. Then he'll send out a flame towards you from his rocket boots, charge to the side to avoid this. Some electric nodes and bombs will appear around Red, electrify the nodes and avoid the bombs. When the four nodes are charged it'll take quite a lot of health off Red, hopefully if you were fast enough it'll take a third off leaving him with 1/3 health left, if not again with the repeating.
Again with the bombs and stomp. Shortly after that he'll start sending rockets at you. Charge away from them, changing direction when he does. Once all the rockets have hit the floor, Horn Dive a switch that pops up, avoiding the Gnorcs shooting. They'll then start shooting at Red instead. You'll probably need to repeat this section at least once as I don't believe that those Gnorcs can kill him in one session.
Finally, with Red defeated the Professor finishes him off. Shrunk smaller then Sparx, Red seems his comeuppance.
And if you got 100% you'll be 'treated' to a short 'hilarious' cutscene involving the Dragon Elders. If you didn't, you'll just see the credits and upon getting 100% you'll be immediately taken to the extra scene for your viewing pleasure.
That's it. Spyro: A Hero's Tail is complete. Seeya.
Comments


I can't remember but it has the elders watching the end credits in Thomas' cave. Trust me, the normal ending is better
All off-topic comments will be deleted. Please do not use the comments system for conversations, instead use the provided forums for the game.
Please login or register a forum account to post a comment.
 darkspyro
 net
net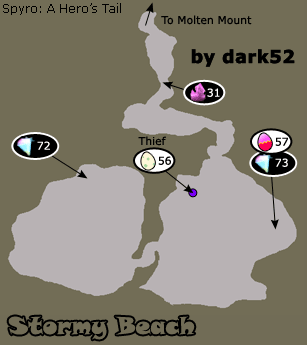