
Walkthrough
Table of Contents
- Nightmare 1
- Nightmare 2
- Dragon Temple 1
- Dragon Temple 2
- Dragon Temple 3
- Vision World 1
- Dragon Temple 4
- Dragon Temple 5
- Dragon Temple 6
- Ancient Grove 1
- Ancient Grove 2
- Vision World 2
- Ancient Grove 3
- Ancient Grove 4
- Ancient Grove 5
- Ancient Grove 6
- Ancient Grove 7
- Ancient Grove 8
- Gladiator Arena 1
- Gladiator Arena 2
- Gladiator Arena 3
- Gladiator Arena 4
- Gladiator Arena 5
- Vision World 3
- Gladiator Arena 6
- Gladiator Arena 7
- Gladiator Arena 8
- Vision World 4
- Celestial Temple 1
- Celestial Temple 2
- Celestial Temple 3
- Celestial Temple 4
- Celestial Temple 5
- Celestial Temple 6
- Celestial Temple 7
- Celestial Temple 8
- Well of Souls 1
- Well of Souls 2
- Well of Souls 3
- Well of Souls 4
- Well of Souls 5
- Well of Souls 6
- Well of Souls 7
- Well of Souls 8
Nightmare 1
As you'll get with every other level you'll be given a quick fly-by of the area, unfortunately the first level has an awful purple fog which means you can't see very far. The rest of the game isn't quite so bad as you can't see where you need to go. You can smash the large mushrooms around the level to get some gems and you can smash the little lanterns at the sides of the path to get nothing. Follow the path along until it gets to a place where the game tells you to do stuff. There's very little point in actually going up the ledges here but if you want to gather some blue gems you can go up. Walk around the platform until you reach the path again.
Follow the path until the game shows you the first enemy, you'll notice it's marked on the map as a red dot. Melee attack it until Sparx tells you that you've thrown it up into the air, this is shown by a white dotted trail going upwards. When you jump you'll be moved to a screen where you can 'juggle' the enemy. This involves looking at the direction the arrow is going in and following it. A down stroke if it's going down, up for up etc. Once you've done what it asked three times the enemy (any enemy at all that you juggle in fact) will die and give you some extra gems than if you'd just waited for it to come back down and melee it to death.
Continue on along the path and you'll meet a second Ape. Kill this one and another will appear where you first saw it. This will happen a lot throughout the game so get used to it. Once you've killed the new one follow the path to where there's a large rock blocking the way. Stand next to and then tap the purple box next to it with your stylus to enter the first puzzle, Fire 1. Simply follow the on-screen instructions to complete this one. The rock will vanish once you successfully complete it and you can cross the bridge.
Nightmare 2
The game will again give you a rubbish flyby with half the screen purple, and will tell you of the task you need to do in order to be allowed to use the next puzzle. You have to actually find three pieces of the puzzle. These will be shown on your map as yellow dots. Go to the left off the path and along the wall and past a well to where there's a Soldier guarding the first mirror.
Go back to the path and follow up until it gets blocked by a large yellow brick pillar. Jump onto it and go up the side to the right. At the top end glide down to the right and onto some platforms, following a path of blue gems if you like. Go up the stepped platforms to the right and out onto the ledge. Go around the building thing to the other side of the circle and along to the second mirror you need to collect.
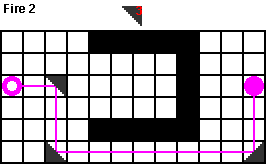
From here glide down to the thin top of a wall below you, walk along it to the far corner and then glide to the platform sticking out of the wall ahead. Follow this to the end and the third puzzle piece. Drop down to the ground and go forwards to where the puzzle is at the end of the path. Once you've beaten Fire 2 the rocks blocking the path will vanish as before. Walk through to finish the level off and emerge from the Nightmare.
Dragon Temple 1
Move forwards down the corridor past a room with some leeches in up to the top. Glide over the chandelier and into a library, go past some leeches and behind the bookshelves where you'll find Dragon Scale #1  which will increase your maximum health.
Go back around and up the slope next to the entrance. Climb the bookshelves on the left-hand side at the top to get up to the highest point in the room. Glide across the chandeliers to the other end of the room.
Jump down and then across the chandelier in the middle of the circular room to finish the area.
Dragon Temple 2
Kill the advancing leeches and head forwards, jumping onto the platforms in the water where you'll find a couple of leeches to either side. The Exploding Bugs here can be killed simply by running around them a bit until they explode, preferably with you not directly next to them though. Go to the left and wait for a lilypad to move so that you can jump onto it. Sit around waiting for it to reach the next pad, the next one after that though you'll have to jump a larger distance to get to as the pad you're on doesn't move very far.
Keep following the lilypads all the way to the far end of the room where there's another leech waiting. Kill it and jump left towards the exit. There's a pair of leeches in the doorway to kill before you can complete this part.
Dragon Temple 3
In rolls an Armourdillo for you to kill, head to the left off the path and jump up the stepped platforms. Glide towards the giant flower by following the trail of purple gems, and then up onto the next one. From there jump forwards onto a platform sticking out of the wall, go left along it jumping over the gap. Once you get to the far end with a crystal, follow the path of red gems down to the left onto the top of a circular stepped pyramid. Now glide down ahead onto proper land, kill a few more leeches and approach the little black dragon waiting for you.
Vision World 1
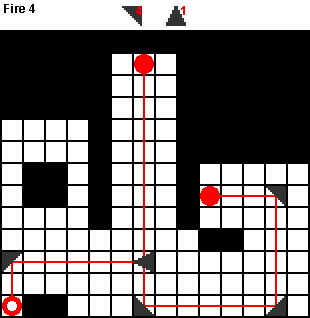
Straight away you'll be confronted with Fire 4, complete it and a large rock will vanish giving way to some steps. Jump up those steps and you'll find yourself in a boss fight against Ignitus. The trick to this fight is to avoid his headbutt attack three times by simply wandering around in a circle, then melee attack him a bit. Repeat and avoid his fire breath that he does once after the penultimate attack on him.
Dragon Temple 4
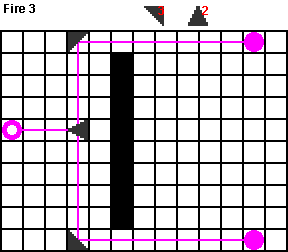
Now we're going the other way. Complete Fire 3 and a grill will vanish letting some lilypads start moving. If you step towards them you'll be informed of your new ability to use Fire Breath, useful in fights but not at the moment (though you may want to take the opportunity to go to the Pause Menu and upgrade your fire breath with the spirit gems you've already earned). Jump onto one of the lilypads and wait as it takes you downstream, jump off onto the lilypads at the far end before it circles back round.
Jump from these pads onto another moving one and it'll take you close enough to shore where you can attack a Soldier or three. Follow the path along and after taking down another Soldier through and into the next part.
Dragon Temple 5
Use the lilypad at the bottom of the steps to get onto the platform to the left where you'll find a single Soldier. Kill him and continue along the lilypad path back across to the other side of the area. Kill the Soldiers waiting on the other side and go through the doorway back inside.
Dragon Temple 6
Jump onto the chandelier in the middle and across to the platform ahead, you'll find Dragon Tooth #1  on the right, these increase your green breath bar in size. Now jump down and onto the next part of the chandelier below. Jump into the library side and go through and around the other side of the bookshelf at the far end, the same place you should have found the first Dragon Scale earlier. Here you'll find the mirror for the puzzle you might have glimpsed in the flythrough when you entered the area.
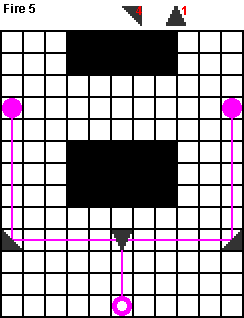
Now go back into the circular chandelier room, jump across and go down the slope to the bottom where you'll be confronted with Fire 5. Solve it to smash some rocks and finish off the Dragon Temple.
Ancient Grove 1
Go along the path ahead, kill the two Toadweeds that pop up and then jump onto any one of the lilypads that are floating on by. Let it carry you down the river to the point where there's an Armourdillo rolling about on a platform, jump up onto that platform on the left and jump further up to where you can glide down to the right. There's one more Toadweed before the next section.
Ancient Grove 2
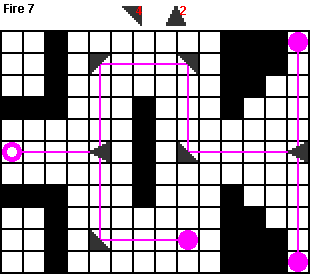
For the puzzle on the right you'll need a couple of mirrors first. Simple enough this time as they're both right here in little alcoves to the left. Once you've killed the Toadweeds and collected the mirrors go solve Fire 7. That'll smash a rock and let you go up the slope behind it.
Kill the three Toadweeds and then jump onto the leaves at the end. Once at the top you should notice two paths of gems, one red leading forwards and one purple leading back. Turn to follow the purple path and glide over to where you'll find Dragon Scale #2 . Go back to the leaf and up onto the ledge at the top. Go around the corner, watching out for an Armourdillo that'll be rolling about, jump off at the end and kill a couple of Toadweeds. At the far end of that platform drop down onto a staircase of rocks sticking out of the wall and onto the ground.
Watch out for another Armourdillo on the floor and make your way straight towards the middle of the area, kill the Toadweeds and jump up onto the green stepped platform. Kill the Toadweed at the top and jump onto the wooden platform.
Vision World 2
Ahead you'll find two puzzles, the far one is the one you need three mirrors for, the near one is free to solve. So solve Earth 3 and a column will rise from the ground. Jump up onto the columns and then onto a stone bridge (unfortunately it's at this point the camera gets a little more annoying than usual). At both ends you'll find a mirror, so that's two down. On the left side there's a passageway through the cave to where you'll see some steps in the wall. Jump up these steps and then jump and glide to a ledge up high. Jump once more to the third mirror above the door, then jump down and back to the puzzle, Earth 4.
Jump up the new platform to where you'll find the large green dragon, Terrador. As with Ignitus previously the trick is to avoid his attack three times, here you will need to jump over his tail as he spins. You will need to start to glide before he starts to spin, he will turn to face you, stick his head and then spin so start the jump 'n' glide just after he faces you. Towards the end he will start a new breath attack that affects the ground at his front, to avoid this just roll away quickly. Once you win you get a cutscene, and, more importantly, Earth Breath.
Ancient Grove 3
With your new breath start on walking down the path ahead. Kill any Scavengers you might bump into, they're like the Soldiers except dressed as pirates. Once you reach the other end of the path jump up the platforms, minding the gaps. Jump down the other side and continue along the obvious path.
You'll spot another Armourdillo rolling along that you'll want to avoid or kill. Once past it continue onwards, there's an entrance to a cave to the left which you can ignore for a moment. Keep on past up to where the ground turns green. Jump onto the platforms on the left and jump back along the direction you just came in.
Once you reach where there's a Scavenger spawn point and a couple of mushrooms you need to turn to the right and go up. Head inside the cave and collect the mirror. Instead of turning around and going back out the same way, jump down to the left and you'll find Dragon Tooth #2 . Exit the cave and continue back along the path again.
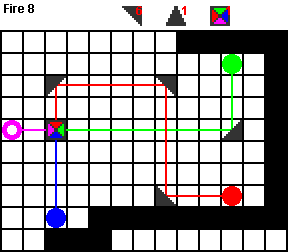
At the end of the path you'll find Fire 8 to solve.
Ancient Grove 4
Go around the little hut thing ahead and then up the steps on the left. Just beyond a Scavenger you'll find the first of the three mirrors in this section. After another Scavenger spawn point take the path towards the left into a cave. You'll find a single Scavenger and Toadweed next to a cauldron, kill them and jump up to the mirror on the right.
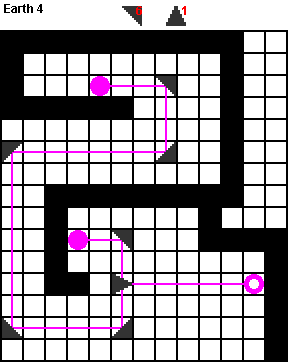
Turn around and go back out of the cave heading left as you exit it. You should find the third mirror on the way down to the puzzle, Fire 9. Once completed the logs blocking the way will disappear as usual.
The next part of the level is a simple traipse along the path and then onto a wooden bridge, of course there are a few simple enemies to kill along the way. Once at the end of the bridge start jumping across the anchor platforms, it's just simple jumping and gliding. At the other end jump back onto the other end of the bridge and walk forwards into the next area.
Ancient Grove 5
You'll come across a few Scavengers along the direct path ahead before reaching a puzzle, one which you need to collect two mirrors for. Continue to the left and down a slope to some steps in the wall ahead. Go up those steps and into the cave at the top, you'll find the first mirror in there.
Jump out and down to the ground and go behind the steps down a thin path with red gems on the floor. Jump up to the right and then up the steps at the end of the short path. Kill the Toadweeds and then jump up the platforms sticking out of the wall at the end. The second mirror is up at the top waiting for you.
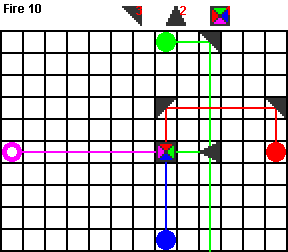
Jump down to the ground and head back to the puzzle, Fire 10. A huge boulder will explode and allow you to get to the next part.
Ancient Grove 6
Kill the Scavenger directly ahead and go right. Along the path you'll meet another Scavenger, once you're past him drop down onto a muddy beach. Head towards the right end of it and jump onto the green platform in the water. Jump to the next and then up the leaves and again towards the tree on the next island, heading of course to the leaves on it.
Go all the way up to the top and kill the Toadweed there. Pick up the mirror and now head back towards the start of the level. Go along the islands in reverse and then up the steps on the beach and along the path. Once you've reach the start just continue onwards along the path.
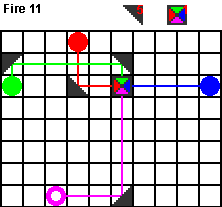
Keep following the path until you reach a pond area, there's a large purple ape on the other side of it. Go around and kill it; it's really no different from killing the other smaller ones except that once he's dead a mirror will appear next to the pond. Pick it up and head over to the puzzle in the corner, Fire 11. Kablammo goes the boulder and you can move on.
Ancient Grove 7
These ancient groves just never seem to end. Head forwards along the path and glide over to the middle tree structure, keep on going up it killing all the Toadweeds along the way. Eventually you get to a point where you need to glide downwards a little, to the right when you land you'll find the first of the two mirrors.
Heading through the middle of the tree you emerge on the other side, carry on along the upwards heading platforms until there's a dip, jump into that dip and collect that second mirror. Now continue going up again until you reach a larger area. Kill the Scavengers in the area with the barrels and use the leaves at the far end to continue on your journey upwards and into a wooden part of the level.
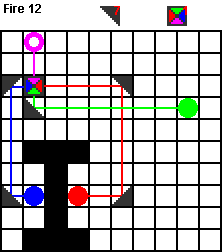
Go through past a Scavenger and you'll finally see the puzzle you got those mirrors for. Once Fire 12 is solved, a whole chunk of the wall will vanish, leaving behind some handy steps to reach the end of the level.
Ancient Grove 8
You're immediately thrown into a boss fight with Skabb. You can avoid the falling cannonballs simply by not being in the middle of the platform. Skabb will then jump down onto one of the platforms and towards you. Let him reach a platform you're on and then run around him as he tries to attack. After three swipes you'll see some red stars over him and you'll be able to attack.
Once you manage it he'll jump off again and start throwing four sets of cluster bombs in your direction. As you hear the sound jump away to a different platform, it doesn't matter which. Once the four have been thrown he'll jump down again and head back to his original position. He'll repeat his whole series of attacks again and then one more time.
Gladiator Arena 1
And so begins a whole series of arena fights. This first one contains a wave of apes, a couple of waves of leeches and a wave of Toadweeds. Once they're all dead (check the map for red dots) you move straight on to the next fight.
Gladiator Arena 2
This one consists of an Armourdillo and some apes, you don't even need to kill the Armourdillo but the apes will be constantly appearing until the end. Make sure to check the doorways if you can't spot any still alive. A note about the doorways, if you go through it yourself you'll appear on the other side of the arena, it's either a great shortcut or good escape route if you're in trouble.
Gladiator Arena 3
It starts with a large ape and a couple of Toadweeds, then it'll continue on with more apes and a couple of Armourdillos before the end.
Gladiator Arena 4
Some new enemies will be in this fight, they're called Sabertooth and look, surprisingly enough, like Sabertooth Tigers except they've got armour on. Simple enough to kill really, just use the same tactics as with all the other normal enemies. You'll get a load of Sabertooths and then some Scavengers will start appearing before finally you get a few more waves of Saberteeth.
Gladiator Arena 5
Loads of waves of all types of enemies will be the theme this time. It'll end after a few Sabertooths.
Vision World 3
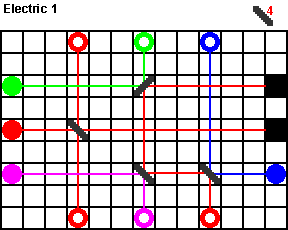
Phew. The puzzle directly ahead of you needs four pieces to solve so head over to the ramp in the corner and go all the way up to the very top of the platforms. You will find all four along the way and once you get there just glide down to the floor and complete Electric 1. This will open up some kind of portal in the middle of the room that you need to jump into.
It'll throw you up to Volteer. His attack consists of jumping to turn and then swiping his tail round. Time your jump at some point between the two to avoid getting hit. After every three times he does this you get the chance to attack him. After a few attacks he'll start his breath attack each cycle, just get out of the way as he turns. And then again jump over his tail as he swings it three times. Attack and repeat until he is defeated.
Gladiator Arena 6
And straight back into an arena fight. With your new Electric Breath you get to fight another new enemy, the Rubble Brute. Wait for it to fire a piece of its arm at you and dodge it. The brute should then be seemingly stunned, fire off an electric breath at it (remember to upgrade it if you can) and then it'll fire another block at you. Repeat until it's defeated.
Gladiator Arena 7
Luckily it's not actually an arena fight. Go forwards into an area with the base of a large mast in the middle. Fight the pair of Scavengers that attack and then go up the stairs at the far end. Kill a few Leaders and pick up the first of three mirrors in the level.
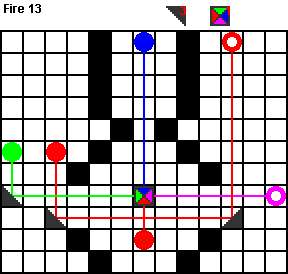
Turn around and go back the way you came, after leaving the mast area go to the right then right again at the wall. Kill the respawning Soldier and grab the mirror behind it. Once more back to where you started and continue to the opposite side, turning right to where you'll find a puzzle. Fire 13 isn't the one that requires the three mirrors so you can do it whenever.
Cross the bridge and you'll enter an area with a couple of ramps leading upwards at either end. Go up the nearest one, fighting the Death Hound that's on it (note that the enemies here will reappear every time you kill them, a good place to get loads of spirit gems if you're not yet fully upgraded). Go up the slope at the back and then jump up onto the large crates (ignore the puzzle).
Go to the top of the pile and turn around, facing the mast. Follow the path of red gems to the platform partway up it and pick up Dragon Tooth #3 . Go further around the mast and grab the third mirror, while falling you'll want to fall into Dragon Scale #3 .
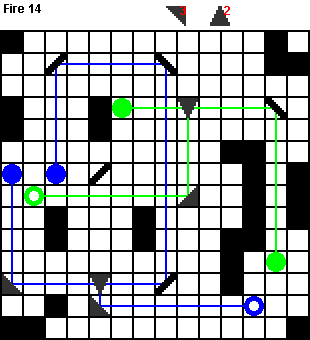
Go back up the slope and complete puzzle Fire 14. Jump down the hole to complete the area.
Gladiator Arena 8
Another fight with Skabb. Just go straight forwards towards him. Like all the previous bosses he has a simple pattern that repeats. First he'll fire his gun, this produces several bullets in a semi-circle, avoid these by rolling around the room (jumping and gliding is not recommended). After that he'll get the cannons around the room to fire. Avoid this by rolling to the side of the room and waiting for the first explosions and then rolling towards the middle before a secondary one hits you. Get to the middle and attack Skabb once or twice. This whole sequence will repeat a few times until you defeat him.
Vision World 4
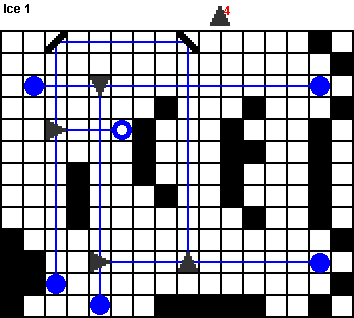
The puzzle directly ahead of you requires three mirrors to work. Go past it and look to the left, you should be able to glide straight to the first mirror. Next jump down to the ground and cross to some steps on the far side. At the top of these in a recess you'll find the second mirror. The third is two platform jumps away. Return to Ice 1 to solve it and gain access to the boss.
Cross the bridge and you'll meet Cyril. Defeat him just like the other three Guardians. Wait for him to begin the twirl and then jump and glide to avoid his tail. Beat him up after every three twists.
Celestial Temple 1
A new breath is yours: Ice. Upgrade it if you can and get moving. Jump up to the left and go backwards along the green platforms, right behind the waterfall you'll find the first of three mirrors in this level. Jump back and continue forwards along the green platforms, watch out for the Exploding Bug just before the glide over the water and a pair just around the next corner.
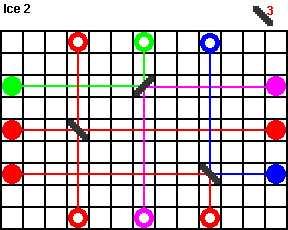
Jump onto the platforms in the water after the Exloding Bugs, and from there jump right and grab the second mirror. Jump back down and along the platforms to the other side of the river. From here avoid a couple of bugs and kill a Toadweed, glide forwards following a purple gem trail to the third mirror. From here you can glide down to the puzzle ahead; Ice 2. Once you've solved it the rock'll explode and allow you to finish this level.
Celestial Temple 2
Go forwards and you'll bump into a pair of Sabertooths. Kill them and just carry on downwards to a few Exploding Bugs. Cross the river and pass the Sabertooth there, around the corner a little you'll be able to climb up some stepped green platforms, at the top glide back across the river and along a high-up path. At the end glide down towards Dragon Tooth #4 to increase your magic.
Glide forwards and across the river again, continue downwards instead of up and pass by the bugs. Cross over the river once more, following the red gems, kill the pair of Sabertooths there and then just jump up the platforms at the end.
Celestial Temple 3
Directly ahead you'll spot a Troll, they're a bit tougher to kill than previous enemies, watch out when they slam their axes down. Once you've killed it jump down to the left, following the red gems of course. Down on the ground you'll meet another Troll, kill him and use the platforms in the middle of the river to continue onwards.
You'll reach a larger platform with another Troll on, jump down the far side and instead of going to yet another waiting for you, turn right and go around the corner, you should spot Dragon Scale #4 sitting hidden behind the large platform.
Now go take care of that other Troll, glide across a couple more small platforms in the water and one more Troll spawn before you get to finish this part (there's another Troll in the right-hand corner if you want to get some more spirit gems).
Celestial Temple 4
Forwards as you'd expect along the little platforms to where you can see a Troll. Another will spawn as you get close so this fight might get a little difficult what with the lack of room. If you have a fury try using Ice or Earth to help out. Once you've killed or ignored them, jump up and turn around to jump onto the high platforms in the room. Follow them, kill the Toadweed in the way, and grab the first mirror of this section. Go back to the doorway where you fought the Trolls now.
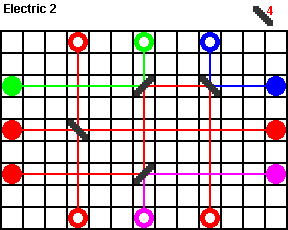
Follow the trail of purple gems across some platforms and go left at the wall. You'll grab the second mirror and see the continuing path of small platforms to jump on. Keep on going slowly upwards and you'll find the third mirror just before the top. Keep on going and you'll reach a bit of solid land with a couple of Trolls on it. Once they're dead jump up and solve Electric 2. Jump in the whirlwind thingy and you get to the next area.
Celestial Temple 5
Walk forwards out of the doorway to a couple of Sabertooths. When they're dead go forwards and ignore the platforms in the middle of the area for now. Instead attack a few more Sabertooths and go into the building in the right-hand corner of the level. You'll find a Troll in here, and more importantly a slope. Go up that slope all the way to the top, ignore the first exit for now.
Glide out and onto some high up small platforms leading back to above where you started the level and the first mirror. Glide across the room to another exit, follow the path of little doorway type things and jump along a series of these sticking out of the wall until you reach the second mirror.
Go back to the slope room and exit the first exit, follow the purple gems to the last mirror. Jump down and solve puzzle Fire 15. Inside the room that opens you'll find a couple of Trolls, once you're done with them jump down the hole in the middle.
Celestial Temple 6
Jump forwards up onto a small platform, and jump up another one to the right and then up to where there's a Troll. Just along the platform near the other end is another Troll waiting to suddenly appear. Go past and jump to the platform behind. Follow the platforms along the to a large platform with another Troll on.
Kill him and jump down the hole to find the first mirror. From here jump and glide over the water to a platform, then it's straight ahead for the second mirror along some train tracks. Go back along the tracks to a wall with some jars on, at the end of that short wall jump up onto platforms on the middle of some pillars. Follow the purple gem trail forwards towards the third mirror.
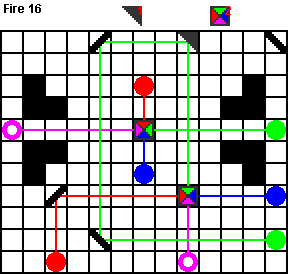
You can now either just jump straight down to the puzzle below or follow the path down by going along the other platform up here that you didn't jump on. Go through the cave fighting the trolls and emerging on the ground, with more Trolls in the way naturally. Once you've gotten rid, complete Fire 16 to finish off.
Celestial Temple 7
Step forwards and kill the pair of Trolls ahead, jump onto the lowest pillar on the right and glide diagonally onto the next up, then up again and one more time to the first of four mirrors.
Jump down and go to the left. Kill the Troll and go to the puzzle on the wall, Earth 15, it isn't the one that requires 4 mirrors. Once solved go up the ramp at the end of the hallway and then jump onto the platforms sticking out of the wall by going to the far end and turning back, you'll find the second mirror. Now drop down and go to the section directly ahead from the start.
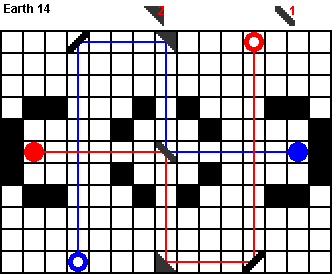
Kill another Troll spawn and solve the mirror puzzle Earth 14. Once done go up the slope, going right at the top. Glide along the sticking out platforms and grab the third mirror.
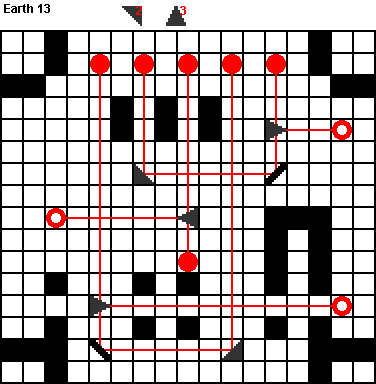
Now into the final portion of the room, kill the troll and ignore the puzzle, this is the one that needs all the puzzle pieces. Go up the ramp, jump onto a platform, over a bridge and then to the fourth mirror. Jump down and solve Earth 13. Now just jump down the hole created (if you've done all three puzzles).
Celestial Temple 8
Head forwards down the blue corridor, at the end you'll see three alcoves with stone Troll statues in, go to the one on the right and, after killing the Troll that comes to life, grab the mirror behind it. Kill the Trolls if you feel like it and go back to the middle of the level again.
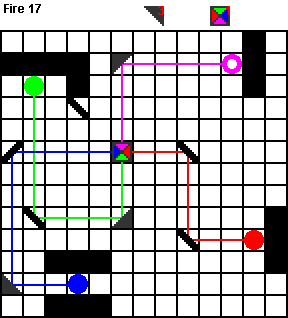
Next go down the purple corridor. The mirror is behind the troll directly ahead. Kill and grab it. Down the yellow corridor and the mirror is on the left. Finally go down the remaining corridor. At the end you'll find a couple of Rubble Brutes which you can easily ignore and just walk straight to the puzzle: Fire 17.
Well of Souls 1
Go forwards and jump up the stepped platforms following them around to the left. You'll find a Death Hound on the way up to the top where you will need to jump and glide to the first of the two mirrors in this level. Jump down and go past the puzzle on the floor.
Drop down the steps ahead to an area with a frozen lake. Head into the cave on the left and head to the right to jump up some platforms. Jump along the platforms and onto a wooden platform heading back towards the entrance to the lake area, the second mirror is at the end. Drop down and jump up the steps to get back to puzzle Fire 18.
Head through the tree trunk and just follow the path over through to the end of the level, it's just over the next bridge.
Well of Souls 2
Head straight forwards out of the tunnel. Kill the Death Hounds and then jump up onto a stepped platform on the left. From the top jump forwards onto a log. The first mirror is over to the left. Turn around and head to the opposite end and glide onto the next platform. From here jump from the far right corner to land on a platform sticking out of the wall with the second mirror.
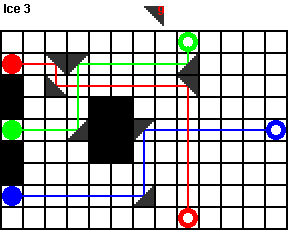
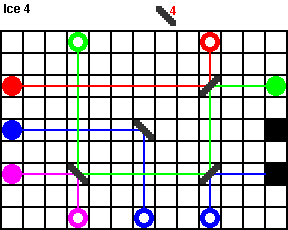
Drop down to the left and down a hole. Kill the pair of Troll and collect the Dragon Scale #5 , the last upgrade for your health. Jump back up out of the hole and go to the middle of the area where you can find puzzle Ice 3.
Cross the new bridge and head to the far right corner of the far side. Climb the frozen waterfall by jumping on the platforms and turning around at the top. Jump to and up the slope to its top. Turn around again and jump up yet more platforms. Jump up to the right at the end and make your way to a fight with a Rubble Brute. Kill it and the ice ahead will melt and all you to finish off this level.
Well of Souls 3
Straight ahead, jump up the platforms and go left at the top. Jump up some more platforms and head right at the top of these. Continue upwards and head left at the top of this one. You will be able to see the final pickup in a cave in the wall at the end. Go collect Dragon Tooth #5 to finish upgrading your Magic Bar.
Jump back to the main path and go right to continue the rest of the way up to the puzzle Fire 19. Complete it and go through the ice wall. Go forwards until you get to a puzzle, ignore it for now and jump down the gap beyond. Kill the Death Hounds down here and then go through the tunnel underneath the puzzle above.
Head right in here, kill the Troll, and jump up the ledge at the end. Avoid falling into the green (it'll kill you) and jump along the tiny platforms to the high circular ledge around the room. Head to the right, kill a Toadweed and then jump up onto some more platforms heading upwards to a mirror in a cave on the wall above.
Once you've got it jump down and head to the right and kill another Toadweed before jumping up some more platforms to get the second mirror in the middle of the room. Jump forwards onto some more platforms and head to the right to grab the third mirror, then jump down to the puzzle ahead of you and solve Earth 16.
Cross the snow drift and head into the next level.
Well of Souls 4
Kill the Rubble Brute ahead in the normal way and then continue forwards past it. Kill a Soldier and then jump up onto the raised platform directly ahead of you. Jump up to the right following the red gem trail and then follow a purple gem trail to the right along some columns to the first of the three mirrors in the level.
Turn around and jump back to just before the columns and continue ahead up the icy platforms. Jump to the highest layer and head to the left, jump over a green river and kill yet another Soldier. Jump down to the left onto a stone building, on the left you'll find the second mirror in an alcove. Jump back and circle your way up to the top of the platform. Jump off onto a long stone path. Follow this along to the end and jump to the left.
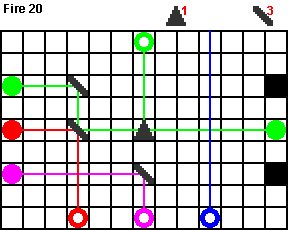
Ahead you'll see some platforms sticking out of the green waterfall, jump up them and onto the layer above. From here jump up to the edge of the waterfall and jump up into the centre of the area. Walk around the circle with the green lake in the middle to the third mirror. Jump down following the river and head towards the mirror puzzle, kill the Rubble Brute guarding it and then solve Fire 20.
Well of Souls 5
Carefully jump down the platforms in the waterfall to the first of two mirrors in this level. Jump up again and continue forwards along the narrow path. Kill the Death Hounds and pass by the puzzle to drop down onto some tall, narrow ice platforms. Make your way down them to the second mirror. Once you've got it jump back up and solve the puzzle Ice 4.
Cross the ice bridge and make your way past a couple of Soldiers. Glide out to the platforms by the waterfall and make your way back onto the path again. Kill some more Soldiers and then jump up a load of small platforms again. Go past some more Soldiers to finish.
Well of Souls 6
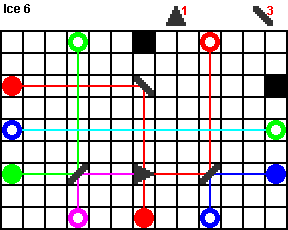
Make your way towards the Soldier ahead of you. Once you've killed it, or just run past if you're bored of killing these by now, head up the slope beyond it. Keep going up past Soldier after Soldier until you reach the tall stone well. Go up the slope on the left side of the area. Keep on going upwards until you reach the top. Jump to the middle of the area and down into the well.
Well of Souls 7
Still not done yet. Head forwards past some Soldiers, through a corridor, past some more Soldiers and onto some floating platforms. Follow them up to third stone platform before turning to the left and jumping onto a standalone platform with the first mirror on it. Jump back to the third, go onto the fourth and straight to the second mirror on the next platform.
Follow the next platform upwards and jump to the mirror in the middle, you might find it a bit tricky to get to but if you glide into the middle you should be able to get it. Continue upwards to the puzzle and the final mirror in the green thing above it. It can be tricky to get this one as well but just keep trying if you keep falling off.
Complete Ice 5 and cross the bridge to the final level.
Well of Souls 8
Go through and kill a pair of Soldiers. Jump onto the columns next to the river and collect the three mirrors on them. Head to the right-hand end of the top of the columns to find the puzzle Ice 6. This will cause a water tower to fall over. Glide to it and you can make it over the river. If for some reason you're low on health there are a ton of jars to the left and right but otherwise head through the tunnel to Gaul.
Gaul will attempt to hit you once and then will throw his axe in a circle around the area but you can just stand on his right side right next to him and it won't hit you. After three throws a bunch of ghosts will start racing around which is your cue to attack Gaul. Stand off to his right and wait a while (he should shield you from the ghosts if you stand close enough but far enough away that they don't hit you anyway), hit him with your Ice Breath from a distance until he wakes up and starts walking towards you.
If the ghosts are still racing around head into the middle of the area and, provided you waited long enough, they should have all moved to the outer areas so you'll probably only have to roll past a couple of ghosts. He'll then start throwing his axe again so just repeat until Gaul is dead. Remember to use the Ice Fury to regain your health if you're having difficulty with the ghosts hitting you.
Roll credits.
Comments


good thing i have internet


All off-topic comments will be deleted. Please do not use the comments system for conversations, instead use the provided forums for the game.
Please login or register a forum account to post a comment.
 darkspyro
 net
net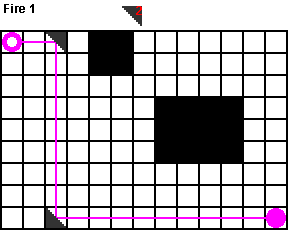
PM me if you need help